Contents
Hello there my fellow dev, welcome to this blog. In this blog tutorial, I will teach you to create Qr Codes in Symfony 5. This tutorial teaches you the step-by-step procedure in order for the reader to easily understand.
What is a QR Code? QR stands for Quick Response. A Qr Code is a type of barcode that is a machine-readable optical label that contains information about the item to which it is attached. Qr Code may contain a locator, identifier, or a link to a website and etc. QR Code is one of the most used types of two-dimensional code.
What is Symfony? Symfony is a PHP framework used to develop web applications, APIs, microservices, and web services. Symfony is one of the leading PHP frameworks for creating websites and web applications.
Before we proceed, please add an image in this directory “public/img/logo.png”, it will be used for inserting images on QR codes.
Step 1: Install Symfony 5
First, select a folder where you want Symfony to be installed then execute this command on Terminal or CMD to install:
Install via composer:
composer create-project symfony/website-skeleton:"^5.4" symfony-5-qr-code-generator
Install via Symfony CLI:
symfony new symfony-5-qr-code-generator --version=5.4 --full
Step 2: Install Endroid QR Code Bundle Package
We will then install this package endroid/qr-code-bundle, this package will be used for generating QR Codes.
composer require endroid/qr-code-bundle
Once done installing the package, we are set to go in generating QR codes.
You can read the more detailed documentation of endroid/qr-code-bundle package by clicking this link.
Step 3: Create A Controller
We will now create our controller, run this command to create a controller:
php bin/console make:controller QrCodeGeneratorController
After creating a controller, add these lines of codes to the src\Controller\QrCodeGeneratorController.php file:
src\Controller\QrCodeGeneratorController.php
<?php

namespace App\Controller;

use Symfony\Bundle\FrameworkBundle\Controller\AbstractController;
use Symfony\Component\HttpFoundation\Response;
use Symfony\Component\Routing\Annotation\Route;
use Endroid\QrCode\Color\Color;
use Endroid\QrCode\Encoding\Encoding;
use Endroid\QrCode\ErrorCorrectionLevel\ErrorCorrectionLevelLow;
use Endroid\QrCode\QrCode;
use Endroid\QrCode\Label\Label;
use Endroid\QrCode\Logo\Logo;
use Endroid\QrCode\Writer\PngWriter;
use Endroid\QrCode\Label\Font\NotoSans;

class QrCodeGeneratorController extends AbstractController
{
    #[Route('/qr-codes', name: 'app_qr_codes')]
    public function index(): Response
    {
        $writer = new PngWriter();
        $qrCode = QrCode::create('https://www.binaryboxtuts.com/')
            ->setEncoding(new Encoding('UTF-8'))
            ->setErrorCorrectionLevel(new ErrorCorrectionLevelLow())
            ->setSize(120)
            ->setMargin(0)
            ->setForegroundColor(new Color(0, 0, 0))
            ->setBackgroundColor(new Color(255, 255, 255));
        $logo = Logo::create('img/logo.png')
            ->setResizeToWidth(60);
        $label = Label::create('')->setFont(new NotoSans(8));

        $qrCodes = [];
        $qrCodes['img'] = $writer->write($qrCode, $logo)->getDataUri();
        $qrCodes['simple'] = $writer->write(
                                $qrCode,
                                null,
                                $label->setText('Simple')
                            )->getDataUri();

        $qrCode->setForegroundColor(new Color(255, 0, 0));
        $qrCodes['changeColor'] = $writer->write(
            $qrCode,
            null,
            $label->setText('Color Change')
        )->getDataUri();

        $qrCode->setForegroundColor(new Color(0, 0, 0))->setBackgroundColor(new Color(255, 0, 0));
        $qrCodes['changeBgColor'] = $writer->write(
            $qrCode,
            null,
            $label->setText('Background Color Change')
        )->getDataUri();

        $qrCode->setSize(200)->setForegroundColor(new Color(0, 0, 0))->setBackgroundColor(new Color(255, 255, 255));
        $qrCodes['withImage'] = $writer->write(
            $qrCode,
            $logo,
            $label->setText('With Image')->setFont(new NotoSans(20))
        )->getDataUri();

        return $this->render('qr_code_generator/index.html.twig', $qrCodes);
    }
}
Step 4: Update The View
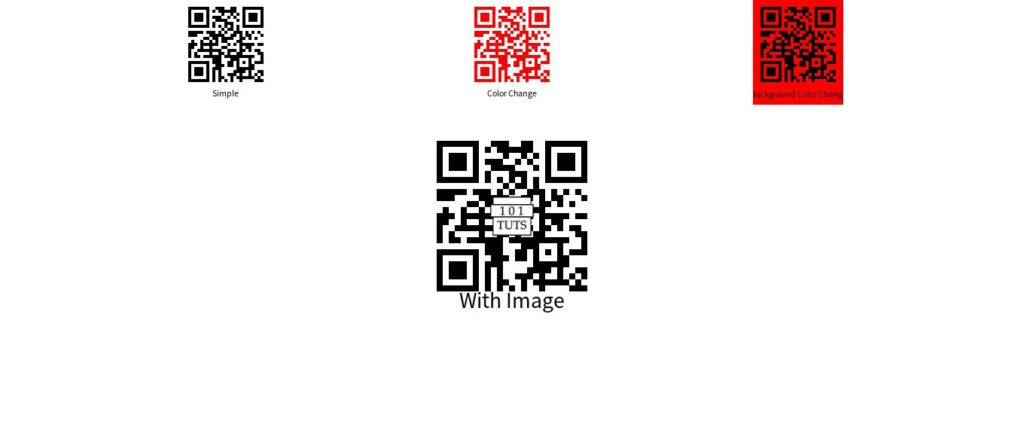
We will now update the view file that was created when we create a controller. Open the file /templates/qr_code_generator/index.html.twig and remove the existing codes and change it into these:
/templates/qr_code_generator/index.html.twig
<!doctype html>
<html lang="en">
  <head>
    <meta charset="utf-8">
    <meta name="viewport" content="width=device-width, initial-scale=1">
    <title>Qr Code</title>
    <link href="https://cdn.jsdelivr.net/npm/bootstrap@5.2.2/dist/css/bootstrap.min.css" rel="stylesheet" integrity="sha384-Zenh87qX5JnK2Jl0vWa8Ck2rdkQ2Bzep5IDxbcnCeuOxjzrPF/et3URy9Bv1WTRi" crossorigin="anonymous">
  </head>
  <body>
    <div class="container text-center">
        <div class="row">
            <div class="col">
                <img src="{{ simple }}" />
            </div>
            <div class="col">
                <img src="{{ changeColor }}" />
            </div>
            <div class="col">
                <img src="{{ changeBgColor }}" />
            </div>
        </div>
        <div class="row mt-5">
            <div class="col">
                <img src="{{ withImage }}" />
            </div>
        </div>
    </div>
    <script src="https://cdn.jsdelivr.net/npm/bootstrap@5.2.2/dist/js/bootstrap.bundle.min.js" integrity="sha384-OERcA2EqjJCMA+/3y+gxIOqMEjwtxJY7qPCqsdltbNJuaOe923+mo//f6V8Qbsw3" crossorigin="anonymous"></script>
  </body>
</html>
Step 5: Run the Application
After finishing the steps above, you can now run your application by executing the command below:
symfony server:start
After successfully running your app, open this URL in your browser:
https://127.0.0.1:8000/qr-codes
Screenshots:
QR Codes


