Contents
- Tutorial Video:
- Prerequisite:
- Step 1: Install Laravel 11
- Step 2: Set Database Configuration
- Step 3: Install Laravel Breeze
- Step 4: Run the App
- Step 5: Install Laravel Reverb
- Step 6: Start the Reverb Server
- Step 7: Create a Model with Migration
- Step 8: Create an Event
- Step 9: Create A Private Channel
- Step 10: Create Controller
- Step 11: Define Routes
- Step 12: Create Inbox Page And Update AuthenticatedLayout
- Step 13: Run The App
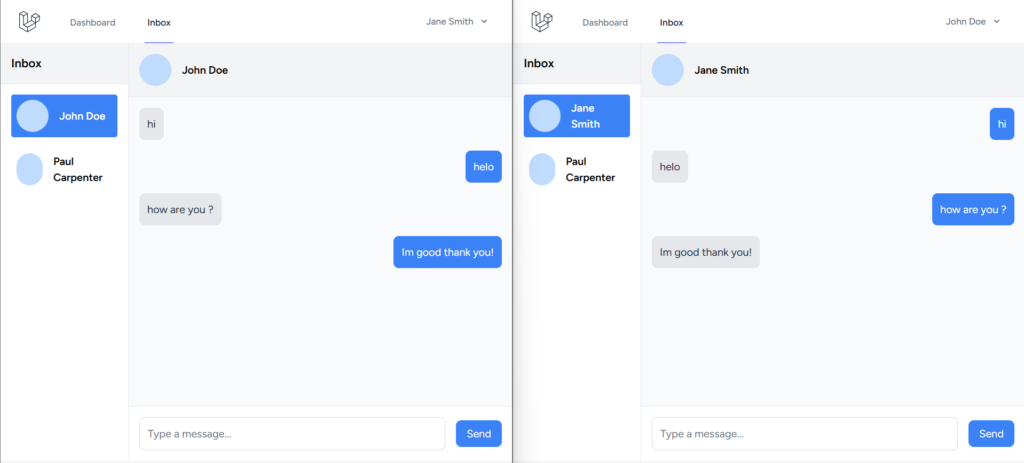
Hi! Today, we will learn how to build a real-time chat app using Laravel in minutes. We will use the packages Laravel has. Before that, let’s have a discussion about what we are using in this tutorial.
Laravel is a free, open-source PHP Web Framework intended for the development of web applications following the MVC (Model-View-Controller) architectural pattern. Laravel is designed to make developing web apps faster and easier by using built-in features.
Laravel Breeze gives you a simple and minimal implementation of login, registration, password reset, email verification, and password confirmation which are part of Laravel’s authentication features.
Vue JS also called vue.js is an open-source JavaScript library used for building user interfaces(UI). It is one of the most popular JavaScript libraries for building the front end.
Laravel Reverb is a first-party WebSocket server for Laravel applications. It brings real-time communication between the client and server directly to your Laravel projects
Tutorial Video:
Prerequisite:
- Composer
- PHP >= 8.2
- Node >= 18
Step 1: Install Laravel 11
First, select a folder you want Laravel to be installed then execute this command on Terminal or CMD to install Laravel 11:
Install via composer:
composer create-project laravel/laravel laravel-11-real-time-chat-app
Install via Laravel Installer:
laravel new laravel-11-real-time-chat-app
Step 2: Set Database Configuration
Open the .env file and set the database configuration:
.env
DB_CONNECTION=mysql
DB_HOST=127.0.0.1
DB_PORT=3306
DB_DATABASE=your database name(laravel_11_real_time_chat_app)
DB_USERNAME=your database username(root)
DB_PASSWORD=your database password(root)
Step 3: Install Laravel Breeze
Then install the Laravel Breeze package
composer require laravel/breeze --dev
After installing packages, run the artisan command breeze:install to publish the authentication views, routes, controller, and other resources to the project.
php artisan breeze:install
We will be choosing Vue with Inertia a as stack:
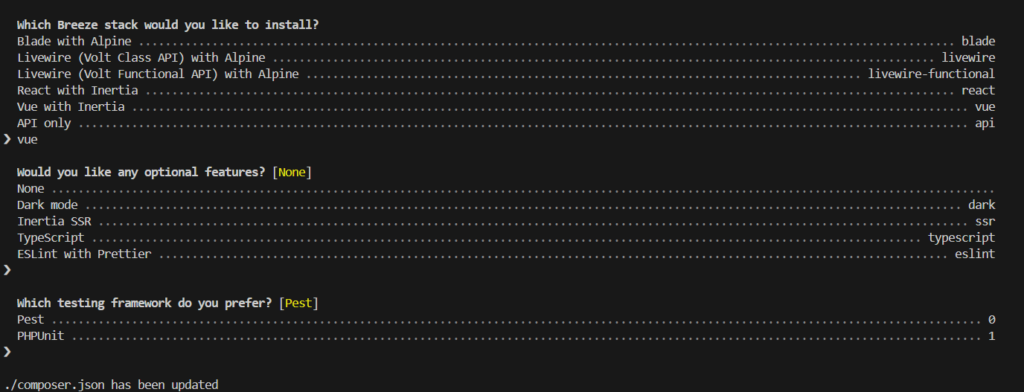
After the installation, run these commands to run the migration and compile the assets.
php artisan migrate
npm install
npm run dev
Step 4: Run the App
Run the laravel app:
php artisan serve
You can now navigate to the login and register URL.
http://localhost:8000/login
http://localhost:8000/register
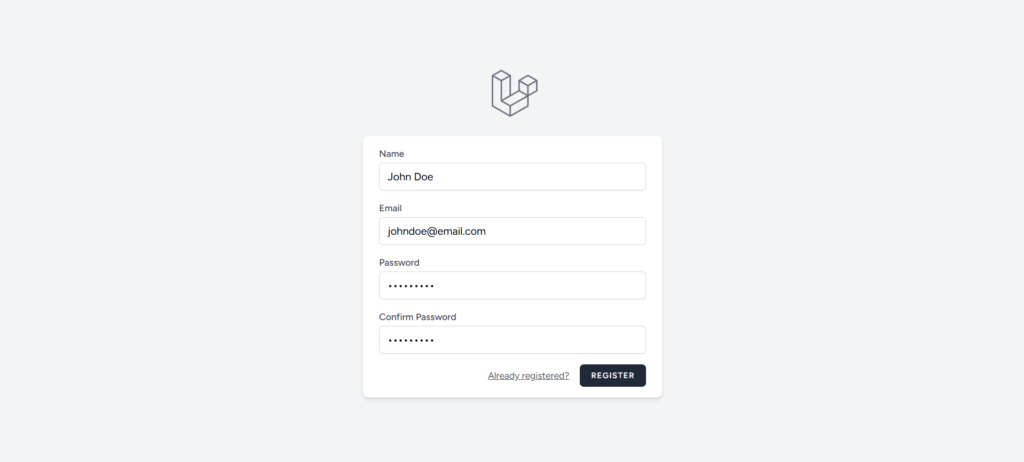
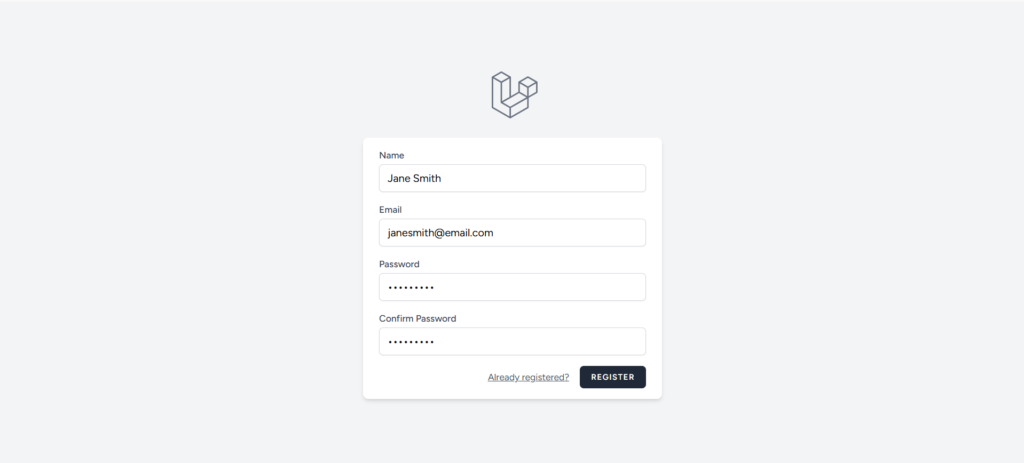
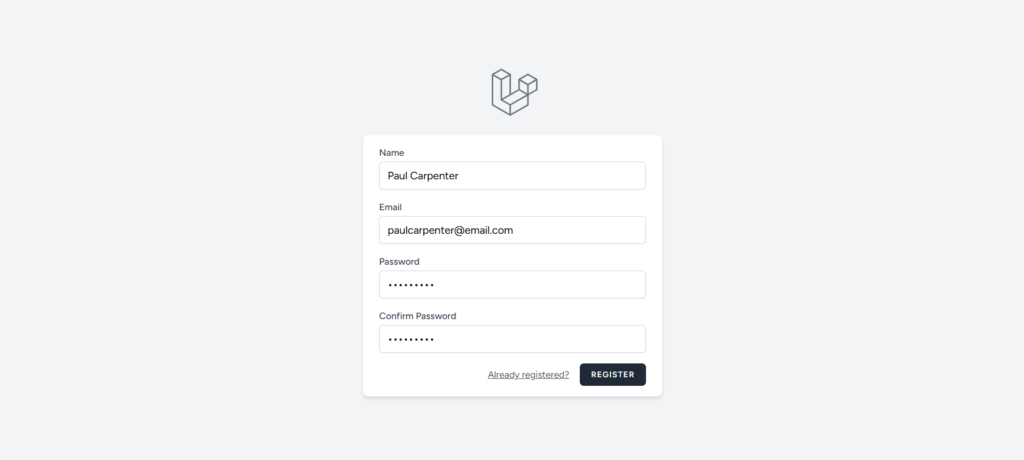
Now register these 3 accounts, we will be using these accounts for the real-time chat.
http://localhost:8000/register
Step 5: Install Laravel Reverb
Install Laravel Reverb by running this command:
php artisan install:broadcasting
This command will set up Reverb with a sensible set of default configuration options.
Step 6: Start the Reverb Server
start the Reverb server with this command:
php artisan reverb:start
By default, the server runs on port 8080. You can specify a custom host or port using the --host and --port options if needed eg. php artisan reverb:start --host=127.0.0.1 --port=9000 .
Step 7: Create a Model with Migration
A model is a class that represents a table on a database.
Migration is like a version of your database.
Run this command on Terminal or CMD:
php artisan make:model Message --migration
After running this command you will find a file in this path “database/migrations” and update the code in that file.
<?php

use Illuminate\Database\Migrations\Migration;
use Illuminate\Database\Schema\Blueprint;
use Illuminate\Support\Facades\Schema;

return new class extends Migration
{
    /**
     * Run the migrations.
     */
    public function up(): void
    {
        Schema::create('messages', function (Blueprint $table) {
            $table->id();
            $table->unsignedBigInteger('sender_id');
            $table->unsignedBigInteger('recipient_id');
            $table->text('message');
            $table->timestamps();

            $table->foreign('sender_id')->references('id')->on('users');
            $table->foreign('recipient_id')->references('id')->on('users');
        });
    }

    /**
     * Reverse the migrations.
     */
    public function down(): void
    {
        Schema::dropIfExists('messages');
    }
};
Run the migration:
php artisan migrate
Step 8: Create an Event
An event is a way to signal that something has happened within your application. It allows you to decouple various parts of your system by letting different parts respond to the same event in their own way. We will now create a MessageSent event class for our message broadcasting and we will use the ShouldBroadcastNow interface to immediately broadcast an event instead of queuing it for later processing. This is especially useful when you need real-time updates without any delay.
php artisan make:event MessageSent
update MessageSent.php
<?php

namespace App\Events;

use App\Models\Message;
use Illuminate\Broadcasting\Channel;
use Illuminate\Broadcasting\InteractsWithSockets;
use Illuminate\Broadcasting\PresenceChannel;
use Illuminate\Broadcasting\PrivateChannel;
use Illuminate\Contracts\Broadcasting\ShouldBroadcast;
use Illuminate\Contracts\Broadcasting\ShouldBroadcastNow;
use Illuminate\Foundation\Events\Dispatchable;
use Illuminate\Queue\SerializesModels;

class MessageSent implements ShouldBroadcastNow
{
    use Dispatchable, InteractsWithSockets, SerializesModels;

    /**
     * Create a new event instance.
     */
    public function __construct(public Message $message)
    {
        //
    }

    /**
     * Get the channels the event should broadcast on.
     *
     * @return array<int, \Illuminate\Broadcasting\Channel>
     */
    public function broadcastOn(): array
    {
        return [
            new PrivateChannel("message.{$this->message->recipient_id}"),
        ];
    }
}
Step 9: Create A Private Channel
The channels.php is a configuration file used for defining the channels your application supports for broadcasting events. This file is located in the routes directory and plays a crucial role in setting up WebSocket channels, both public and private, for real-time event broadcasting.
- Public Channels: Accessible to anyone.
- Private Channels: Require authentication to join.
We will now add a private channel for the chat app:
channels.php
<?php

use Illuminate\Support\Facades\Broadcast;

// Broadcast::channel('App.Models.User.{id}', function ($user, $id) {
//     return (int) $user->id === (int) $id;
// });

Broadcast::channel('message.{id}', function ($user, $id) {
    return (int) $user->id === (int) $id;
});
Step 10: Create Controller
We will now create to handle our messaging API. Run this command to create a controller:
php artisan make:controller MessageController
Add these lines of code:
<?php

namespace App\Http\Controllers;

use App\Events\MessageSent;
use App\Models\Message;
use App\Models\User;
use Illuminate\Http\Request;
use Illuminate\Support\Facades\Auth;
use Inertia\Inertia;

class MessageController extends Controller
{

    public function inbox() {
        $users = User::where('id', '!=', Auth::user()->id)->get();
        return Inertia::render('Inbox', ['users' => $users]);
    }

    public function store(Request $request, User $user) {
        $message = new Message;
        $message->sender_id = Auth::user()->id;
        $message->recipient_id = $user->id;
        $message->message = $request->message;
        $message->save();

        broadcast(new MessageSent($message));

        return response()->json($message);
    }

    public function show(User $user) {
        $user1Id = Auth::user()->id;
        $user2Id = $user->id;

        $messages = Message::where(function ($query) use ($user1Id, $user2Id) {
            $query->where('sender_id', $user1Id)
                  ->where('recipient_id', $user2Id);
        })
        ->orWhere(function ($query) use ($user1Id, $user2Id) {
            $query->where('sender_id', $user2Id)
                  ->where('recipient_id', $user1Id);
        })
        ->orderBy('created_at', 'asc')
        ->get();

        return response()->json($messages);
    }
}
Step 11: Define Routes
Update web.php to include routes for the MessageController:
web.php
<?php

use App\Http\Controllers\MessageController;
use App\Http\Controllers\ProfileController;
use Illuminate\Foundation\Application;
use Illuminate\Support\Facades\Route;
use Inertia\Inertia;

Route::get('/', function () {
    return Inertia::render('Welcome', [
        'canLogin' => Route::has('login'),
        'canRegister' => Route::has('register'),
        'laravelVersion' => Application::VERSION,
        'phpVersion' => PHP_VERSION,
    ]);
});

Route::get('/dashboard', function () {
    return Inertia::render('Dashboard');
})->middleware(['auth', 'verified'])->name('dashboard');

Route::middleware('auth')->group(function () {
    Route::get('/profile', [ProfileController::class, 'edit'])->name('profile.edit');
    Route::patch('/profile', [ProfileController::class, 'update'])->name('profile.update');
    Route::delete('/profile', [ProfileController::class, 'destroy'])->name('profile.destroy');

    Route::get('/inbox', [MessageController::class, 'inbox'])->name('inbox');
    Route::post('/message/{user}', [MessageController::class, 'store'])->name('message.store');
    Route::get('/message/{user}', [MessageController::class, 'show'])->name('message.show');
});

require __DIR__.'/auth.php';
Step 12: Create Inbox Page And Update AuthenticatedLayout
We will now create a react component for our inbox page. Create a file inside resources\js\Pages\, the filename is Inbox.vue . And add these lines of codes:
resources\js\Pages\Inbox.vue
<script setup>
  import AuthenticatedLayout from '@/Layouts/AuthenticatedLayout.vue';
  import { Head } from '@inertiajs/vue3';
  import { ref, onMounted, watch, onBeforeUnmount } from 'vue';
  import { usePage } from '@inertiajs/vue3';
  import axios from 'axios';


  defineProps({
    auth: Object,
    users: Array,
  });

  const auth = usePage().props.auth;
  const users = usePage().props.users;

  const selectedUser = ref(null);
  const currentMessages = ref([]);
  const messageInput = ref('');
  const targetScrollRef = ref(null);

  const webSocketChannel = `message.${auth.user.id}`;

  const scrollToBottom = () => {
    if (targetScrollRef.value) {
      targetScrollRef.value.scrollIntoView({ behavior: 'smooth' });
    }
  };

  const sendMessage = async () => {
    let payload = {
      message: messageInput.value
    }
    messageInput.value = '';
    await axios.post(`/message/${selectedUser.value.id}`, payload);
    getMessages();
  };

  const getMessages = async () => {
    const response = await axios.get(`/message/${selectedUser.value.id}`);
    currentMessages.value = response.data;
    setTimeout(scrollToBottom, 100);
  };

  const setSelectedUser = (user) => {
    selectedUser.value = user;
    getMessages();
  };


  const connectWebSocket = () => {
    window.Echo.private(webSocketChannel).listen('MessageSent', async () => {
      await getMessages();
    });
  };

  onMounted(() => {
    connectWebSocket();
  });

  onBeforeUnmount(() => {
    window.Echo.leave(webSocketChannel);
  });

</script>

<template>
    <Head title="Inbox" />
    <AuthenticatedLayout>

      <div class="h-screen flex bg-gray-100 mx-auto max-w-7xl sm:px-6 lg:px-8" style="height: 90vh;">
        <!-- Sidebar -->
        <div class="w-1/4 bg-white border-r border-gray-200">
          <div class="p-4 bg-gray-100 font-bold text-lg border-b border-gray-200">
            Inbox
          </div>
          <div class="p-4 space-y-4">
            <!-- Contact List -->
            <div
              v-for="(user, key) in users"
              :key="key"
              @click="setSelectedUser(user)"
              :class="[
                'flex items-center p-2 hover:bg-blue-500 hover:text-white rounded cursor-pointer',
                user.id === selectedUser?.id ? 'bg-blue-500 text-white' : ''
              ]"
            >
              <div class="w-12 h-12 bg-blue-200 rounded-full"></div>
              <div class="ml-4">
                <div class="font-semibold">{{ user.name }}</div>
              </div>
            </div>
          </div>
        </div>

        <!-- Chat Area -->
        <div class="flex flex-col w-3/4">
          <!-- No Conversation Selected -->
          <div
            v-if="!selectedUser"
            class="h-full flex justify-center items-center text-gray-800 font-bold"
          >
            Select Conversation
          </div>

          <!-- Conversation Selected -->
          <template v-else>
            <!-- Chat Header -->
            <div class="p-4 border-b border-gray-200 flex items-center">
              <div class="w-12 h-12 bg-blue-200 rounded-full"></div>
              <div class="ml-4">
                <div class="font-bold">{{ selectedUser?.name }}</div>
              </div>
            </div>

            <!-- Chat Messages -->
            <div class="flex-1 overflow-y-auto p-4 space-y-4 bg-gray-50">
              <div
                v-for="(message, index) in currentMessages"
                :key="index"
                :class="[
                  'flex',
                  message.sender_id === auth.user.id ? 'justify-end' : 'justify-start'
                ]"
              >
                <div
                  :class="[
                    'p-3 rounded-lg max-w-xs',
                    message.recipient_id === auth.user.id
                      ? 'bg-gray-200 text-gray-800'
                      : 'bg-blue-500 text-white'
                  ]"
                >
                  {{ message.message }}
                </div>
              </div>
              <span ref="targetScrollRef"></span>
            </div>

            <!-- Message Input -->
            <div class="p-4 bg-white border-t border-gray-200">
              <div class="flex items-center">
                <input
                  type="text"
                  placeholder="Type a message..."
                  class="flex-1 p-3 border border-gray-300 rounded-lg focus:outline-none focus:ring-2 focus:ring-blue-500"
                  v-model="messageInput"
                />
                <button
                  @click="sendMessage"
                  class="ml-4 px-4 py-2 bg-blue-500 text-white rounded-lg hover:bg-blue-600"
                >
                  Send
                </button>
              </div>
            </div>
          </template>
        </div>
      </div>
    </AuthenticatedLayout>
  </template>
resources\js\Layouts\AuthenticatedLayout.vue
<script setup>
import { ref } from 'vue';
import ApplicationLogo from '@/Components/ApplicationLogo.vue';
import Dropdown from '@/Components/Dropdown.vue';
import DropdownLink from '@/Components/DropdownLink.vue';
import NavLink from '@/Components/NavLink.vue';
import ResponsiveNavLink from '@/Components/ResponsiveNavLink.vue';
import { Link } from '@inertiajs/vue3';
const showingNavigationDropdown = ref(false);
</script>
<template>
<div>
<div class="min-h-screen bg-gray-100">
<nav
class="border-b border-gray-100 bg-white"
>
<!-- Primary Navigation Menu -->
<div class="mx-auto max-w-7xl px-4 sm:px-6 lg:px-8">
<div class="flex h-16 justify-between">
<div class="flex">
<!-- Logo -->
<div class="flex shrink-0 items-center">
<Link :href="route('dashboard')">
<ApplicationLogo
class="block h-9 w-auto fill-current text-gray-800"
/>
</Link>
</div>
<!-- Navigation Links -->
<div
class="hidden space-x-8 sm:-my-px sm:ms-10 sm:flex"
>
<NavLink
:href="route('dashboard')"
:active="route().current('dashboard')"
>
Dashboard
</NavLink>
</div>
<div
class="hidden space-x-8 sm:-my-px sm:ms-10 sm:flex"
>
<NavLink
:href="route('inbox')"
:active="route().current('inbox')"
>
Inbox
</NavLink>
</div>
</div>
<div class="hidden sm:ms-6 sm:flex sm:items-center">
<!-- Settings Dropdown -->
<div class="relative ms-3">
<Dropdown align="right" width="48">
<template #trigger>
<span class="inline-flex rounded-md">
<button
type="button"
class="inline-flex items-center rounded-md border border-transparent bg-white px-3 py-2 text-sm font-medium leading-4 text-gray-500 transition duration-150 ease-in-out hover:text-gray-700 focus:outline-none"
>
{{ $page.props.auth.user.name }}
<svg
class="-me-0.5 ms-2 h-4 w-4"
xmlns="http://www.w3.org/2000/svg"
viewBox="0 0 20 20"
fill="currentColor"
>
<path
fill-rule="evenodd"
d="M5.293 7.293a1 1 0 011.414 0L10 10.586l3.293-3.293a1 1 0 111.414 1.414l-4 4a1 1 0 01-1.414 0l-4-4a1 1 0 010-1.414z"
clip-rule="evenodd"
/>
</svg>
</button>
</span>
</template>
<template #content>
<DropdownLink
:href="route('profile.edit')"
>
Profile
</DropdownLink>
<DropdownLink
:href="route('logout')"
method="post"
as="button"
>
Log Out
</DropdownLink>
</template>
</Dropdown>
</div>
</div>
<!-- Hamburger -->
<div class="-me-2 flex items-center sm:hidden">
<button
@click="
showingNavigationDropdown =
!showingNavigationDropdown
"
class="inline-flex items-center justify-center rounded-md p-2 text-gray-400 transition duration-150 ease-in-out hover:bg-gray-100 hover:text-gray-500 focus:bg-gray-100 focus:text-gray-500 focus:outline-none"
>
<svg
class="h-6 w-6"
stroke="currentColor"
fill="none"
viewBox="0 0 24 24"
>
<path
:class="{
hidden: showingNavigationDropdown,
'inline-flex':
!showingNavigationDropdown,
}"
stroke-linecap="round"
stroke-linejoin="round"
stroke-width="2"
d="M4 6h16M4 12h16M4 18h16"
/>
<path
:class="{
hidden: !showingNavigationDropdown,
'inline-flex':
showingNavigationDropdown,
}"
stroke-linecap="round"
stroke-linejoin="round"
stroke-width="2"
d="M6 18L18 6M6 6l12 12"
/>
</svg>
</button>
</div>
</div>
</div>
<!-- Responsive Navigation Menu -->
<div
:class="{
block: showingNavigationDropdown,
hidden: !showingNavigationDropdown,
}"
class="sm:hidden"
>
<div class="space-y-1 pb-3 pt-2">
<ResponsiveNavLink
:href="route('dashboard')"
:active="route().current('dashboard')"
>
Dashboard
</ResponsiveNavLink>
</div>
<!-- Responsive Settings Options -->
<div
class="border-t border-gray-200 pb-1 pt-4"
>
<div class="px-4">
<div
class="text-base font-medium text-gray-800"
>
{{ $page.props.auth.user.name }}
</div>
<div class="text-sm font-medium text-gray-500">
{{ $page.props.auth.user.email }}
</div>
</div>
<div class="mt-3 space-y-1">
<ResponsiveNavLink :href="route('profile.edit')">
Profile
</ResponsiveNavLink>
<ResponsiveNavLink
:href="route('logout')"
method="post"
as="button"
>
Log Out
</ResponsiveNavLink>
</div>
</div>
</div>
</nav>
<!-- Page Heading -->
<header
class="bg-white shadow"
v-if="$slots.header"
>
<div class="mx-auto max-w-7xl px-4 py-6 sm:px-6 lg:px-8">
<slot name="header" />
</div>
</header>
<!-- Page Content -->
<main>
<slot />
</main>
</div>
</div>
</template>
If some tailwind classes are not working, please rerun npm run dev and clear your browser cache!
Step 13: Run The App
These are the commands you need to rerun your app. Since we already run this command in our previous step, there is no need to run the commands below.
Starts the development server of the Laravel application:
php artisan serve
Compile and build frontend assets:
npm run dev
Start Laravel Reverb WebSocket server:
php artisan reverb:start
Now test your app:
http://127.0.0.1:8000
http://127.0.0.1:8000/inbox
