Contents
- Prerequisite:
- File Structure Preview:
- Step 1:Initialize Node.js project
- Step 2: Install Packages
- Step 3: Setup Express Application
- Step 4: Update package.json
- Step 5: Setup Environment Variables
- Step 6: Create A Model
- Step 7: Create A Request
- Step 8: Create A Controller
- Step 9: Create A Middleware
- Step 10: Create A Route
- Step 11: Start the Express App
- Test the API:
Hi! Today we will learn how to create an authentication on our Express Js API. But before that let’s have a discussion about API and what is JSON Web Token(JWT).
API stands for Application Program Interface, API is an interface that allows applications to exchange data. To make it more clear, APIs are a set of functions that can be used by programmers to build software and applications.
JWT stands for JSON Web Token, it is an open standard (RFC 7519) that defines a compact and self-contained way for securely transmitting information between parties as a JSON object. JWT is commonly used for Authorization, Information Exchange and etc.
Express.js – commonly referred to as Express, is a minimal and flexible web application framework for Node.js. It provides a robust set of features to develop web and mobile applications. Express.js simplifies the process of building web servers and APIs in Node.js by providing a powerful and easy-to-use set of features.
Node.js – is an open-source, cross-platform JavaScript runtime environment that allows developers to run JavaScript code outside of a web browser. It uses the V8 JavaScript engine from Google Chrome to execute code, making it possible to use JavaScript for server-side scripting.
MongoDB – is a popular open-source NoSQL database program. It is classified as a document-oriented database, belonging to the family of NoSQL databases, which do not use the traditional table-based relational database structure used in SQL databases like MySQL and PostgreSQL.
Now that we have a glimpse of the idea on the topic, We will now proceed on building the app.
Prerequisite:
- MongoDB
- Node >= 18.20.2
File Structure Preview:

Step 1:Initialize Node.js project
Create a folder named express-jwt, go into the newly created folder open your terminal or cmd, and run this command:
npm init -y
Running npm init -y initializes a new Node.js project in the current directory using default values for package.json fields, without requiring user input. The -y flag stands for “yes,” which means it automatically accepts all defaults. This command is useful for quickly setting up a new project without having to manually enter information for each field in the package.json file.
Step 2: Install Packages
After initializing a node.js project, let’s install the packages that we will be using:
npm install express
npm install dotenv
npm install cors
npm install mongoose
npm install bcrypt
npm install validator
npm install jsonwebtoken
- express – Express.js is a minimal and flexible Node.js web application framework that provides a robust set of features for building web applications and APIs. It is designed to make the process of creating server-side applications in Node.js simpler and more efficient.
- dotenv – is a popular npm package that loads environment variables from a .env file into process.env, making it easy to manage configuration settings in Node.js applications.
- cors – CORS (Cross-Origin Resource Sharing) middleware package in a Node.js project. CORS is a security feature implemented by web browsers to prevent unauthorized access to resources hosted on a different origin (domain, protocol, or port) than the one making the request.
- mongoose – Mongoose is an Object Data Modeling (ODM) library for MongoDB and Node.js, designed to work in an asynchronous environment. It provides a straightforward schema-based solution to model your application data and handle interactions with a MongoDB database.
- bcrypt – is a popular library for hashing passwords securely. It uses a one-way hashing algorithm to convert passwords into a string of characters that cannot be reversed back into the original password. This helps protect user passwords from being compromised in case of a data breach.
- validator – Validator.js is a library that provides a set of string validation and sanitization functions. It’s commonly used for validating user input, such as form data, and ensuring that it meets certain criteria, such as being a valid email address, URL, or numeric value. This helps improve the security and reliability of your application by preventing invalid or malicious input from being processed
- jsonwebtoken – JSON Web Tokens are used for securely transmitting information between parties as a JSON object. The library jsonwebtoken is widely used in Node.js applications for handling JWT creation, verification, and decoding. If you’re developing a web application with Node.js and you need to implement authentication or secure data transmission, using JSON Web Tokens with jsonwebtoken is a popular choice.
Then let’s install the nodemon package, if you have already installed nodemon you can skip this.
- nodemon – is a utility that monitors changes in your Node.js application files and automatically restarts the server whenever a change is detected. This eliminates the need to manually stop and restart the server every time you make changes to your code, making the development process more efficient and productive. Nodemon is particularly useful during the development phase of a Node.js application when you frequently make changes to your code and want to see the changes reflected immediately without having to restart the server manually.
npm install -g nodemon
Running npm install -g nodemon installs the Nodemon package globally on your system. The -g flag stands for “global,” which means Nodemon will be installed in a location accessible system-wide, rather than being installed locally in a specific project directory.
Step 3: Setup Express Application
Create a file inside our root folder, name the file server.js, and add these lines of codes:
server.js
require('dotenv').config()

const express = require('express')
const mongoose = require('mongoose')
const cors = require('cors')
const userRoutes = require('./routes/userApi')

// express app
const app = express()

// middleware
app.use(express.json())
app.use(cors())

// routes
app.use('/api/user', userRoutes)

// connect to db
mongoose.connect(process.env.MONGO_URI)
.then(() => {
  console.log("db connection established")
  app.listen(process.env.PORT, () => {
    console.log('listening on port ', process.env.PORT)
  })
})
.catch((error) => {
  console.log(error)
})
In an Express.js application, the entry point is typically the main file where you initialize the Express server and define its configurations, routes, and middleware. This main file is commonly named server.js or app.js, but it can be named anything you prefer.
The entry point file is where you set up your Express application by importing the necessary modules, creating an instance of Express, defining routes, applying middleware, and starting the server. It’s the starting point of your application’s execution.
Step 4: Update package.json
Add this line on the scripts field “dev”: “nodemon server.js”. The scripts field defines a set of commands that can be executed via npm. These scripts provide shortcuts for common development tasks, such as starting the server, running tests, building the project, etc.
package.json
{
  "name": "express-api",
  "version": "1.0.0",
  "description": "",
  "main": "index.js",
  "scripts": {
    "test": "echo \"Error: no test specified\" && exit 1",
    "dev": "nodemon server.js"
  },
  "keywords": [],
  "author": "",
  "license": "ISC",
  "dependencies": {
    "bcrypt": "^5.1.1",
    "cors": "^2.8.5",
    "dotenv": "^16.4.5",
    "express": "^4.19.2",
    "jsonwebtoken": "^9.0.2",
    "mongoose": "^8.3.2",
    "validator": "^13.11.0"
  }
}
Step 5: Setup Environment Variables
Create a .env file, and add the environment variables.
.env
PORT=4000
MONGO_URI=mongodb://localhost:27017/express_jwt
SECRET=THIS_IS_DUMMY_SECRET_CREATE_A_MORE_SECURE_SECRET
- PORT – port number on which the server should listen for incoming HTTP requests
- MONGO_URI – refers to the Uniform Resource Identifier (URI) used to connect to a MongoDB database. It contains information such as the protocol, hostname, port, database name, and optionally authentication credentials.
- SECRET – The secret is used in conjunction with cryptographic algorithms to sign the payload of the JWT, ensuring its integrity and authenticity. When a JWT is created, the payload is encoded and then signed with the secret. Upon receiving the JWT, the consumer can verify its authenticity by decoding it and validating the signature using the same secret. In this tutorial, we are using a dummy secret, you must create a more secure secret on your app.
You can get the url when you open the MongoDBCompass:

Note: if an error occurs when connecting to db when we start our app. Change the localhost to 127.0.0.1
Sample .env
PORT=4000
MONGO_URI=mongodb://127.0.0.1:27017/express_rest_api
SECRET=THIS_IS_DUMMY_SECRET_CREATE_A_MORE_SECURE_SECRET
Step 6: Create A Model
Create a folder named models inside our root folder, and inside it create a file named userModel.js and add these lines of code.
models\userModel.js
const mongoose = require('mongoose')

const Schema = mongoose.Schema

const userSchema = new Schema({
  email: {
    type: String,
    required: true,
    unique: true
  },
  password: {
    type: String,
    required: true
  }
})

module.exports = mongoose.model('User', userSchema)
Step 7: Create A Request
Create a folder named requests inside our root folder, and inside it create 2 files named loginRequest.js and signupRequest.js, then add these lines of code.
requests\loginRequest.js
const validator = require('validator')
const bcrypt = require('bcrypt')
const User = require('../models/userModel')

const loginRequest = async (req) => {
    let errors = {};
    let hasErrors = false;
    const {email, password} = req.body

    if(validator.isEmpty(email)) {
        errors.email = "Email is required."
    }

    if (!validator.isEmail(email)) {
        errors.email = "Email not valid."
    }

    const user = await User.findOne({ email })
    if (!user) {
        errors.email = "Incorrect email."
    }

    if(validator.isEmpty(password)) {
        errors.password = "Password is required."
    }

    const match = await bcrypt.compare(password, user.password)
    if (!match) {
      errors.password = "Incorrect password."
    }

    if(Object.keys(errors).length > 0) {
        hasErrors = true;
    }

    return {
        hasErrors: hasErrors,
        errors:errors
    }
}

module.exports = loginRequest
requests\signupRequest.js
const User = require('../models/userModel')
const validator = require('validator')

const signupRequest = async (req) => {
    let errors = {};
    let hasErrors = false;
    const {email, password, confirm_password} = req.body

    if(validator.isEmpty(email)) {
        errors.email = "Email is required."
    }

    if (!validator.isEmail(email)) {
        errors.email = "Email not valid."
    }

    const exists = await User.findOne({ email })

    if(exists) {
        errors.email = "Email already in exist."
    }

    if(validator.isEmpty(password)) {
        errors.password = "Password is required."
    }

    if(!validator.matches(password, confirm_password)){
        errors.password = "Password and Confirm Password does not match."
    }

    if(Object.keys(errors).length > 0) {
        hasErrors = true;
    }

    return {
        hasErrors: hasErrors,
        errors:errors
    }
}

module.exports = signupRequest
Step 8: Create A Controller
Create a folder named controllers inside our root folder, and inside it create a file named userController.js and add these lines of code.
controllers\userController.js
const User = require('../models/userModel')
const bcrypt = require('bcrypt')
const jwt = require('jsonwebtoken')
const signupRequest = require('../requests/signupRequest')
const loginRequest = require('../requests/loginRequest')

const createToken = (_id) => {
  return jwt.sign({_id}, process.env.SECRET, { expiresIn: '3d' })
}

const loginUser = async (req, res) => {
  const {email} = req.body

  try {
    const validation = await loginRequest(req);
    if(!validation.hasErrors){
      const user = await User.findOne({ email })
      const token = createToken(user._id)

      res.status(200).json({email, token})
    } else {
      res.status(422).json(validation.errors)
    }
  } catch (error) {

    res.status(400).json({error: error.message})
  }
}


const signupUser = async (req, res) => {
  const {email, password} = req.body

  try {
    const validation = await signupRequest(req)
    if(!validation.hasErrors){
      const salt = await bcrypt.genSalt(10)
      const hash = await bcrypt.hash(password, salt)
      const user = await User.create({ email, password: hash })
      const token = createToken(user._id)

      res.status(200).json({email, token})
    } else {

      res.status(422).json(validation.errors)
    }

  } catch (error) {

    res.status(400).json({error: error.message})
  }
}

const getUser = async (req, res) => {
  const id = req.user._id

  try {
    const user = await User.findOne({ _id:id }).select(['_id', 'email'])

    res.status(200).json(user)
  } catch (error) {

    res.status(400).json({error: error.message})
  }
}

module.exports = { signupUser, loginUser, getUser }
Step 9: Create A Middleware
Create a folder named middlewares inside our root folder, and inside it create a file named authApi.js and add these lines of code.
middlewares\authApi.js
const jwt = require('jsonwebtoken')
const User = require('../models/userModel')

const authApi = async (req, res, next) => {

  const { authorization } = req.headers

  if (!authorization) {
    return res.status(401).json({error: 'Authorization token required'})
  }

  const token = authorization.split(' ')[1]

  try {
    const { _id } = jwt.verify(token, process.env.SECRET)
    req.user = await User.findOne({ _id }).select('_id')
    next()

  } catch (error) {

    res.status(401).json({error: 'Request is not authorized'})
  }
}

module.exports = authApi
Step 10: Create A Route
Create a folder named routes inside our root folder, and inside it create a file named userApi.js and add these lines of code.
routes\userApi.js
const express = require('express')
const authApi = require('../middlewares/authApi')
const { loginUser, signupUser, getUser } = require('../controllers/userController')

const router = express.Router()


router.post('/login', loginUser)
router.post('/signup', signupUser)
router.get('/me', authApi, getUser)

module.exports = router
Step 11: Start the Express App
Run this command to start the Express App:
npm run dev
After successfully running your app, the base url of our app will be:
http://localhost:4000
Test the API:
We will be using Insomia for testing our API, but you can use your preferred tool.
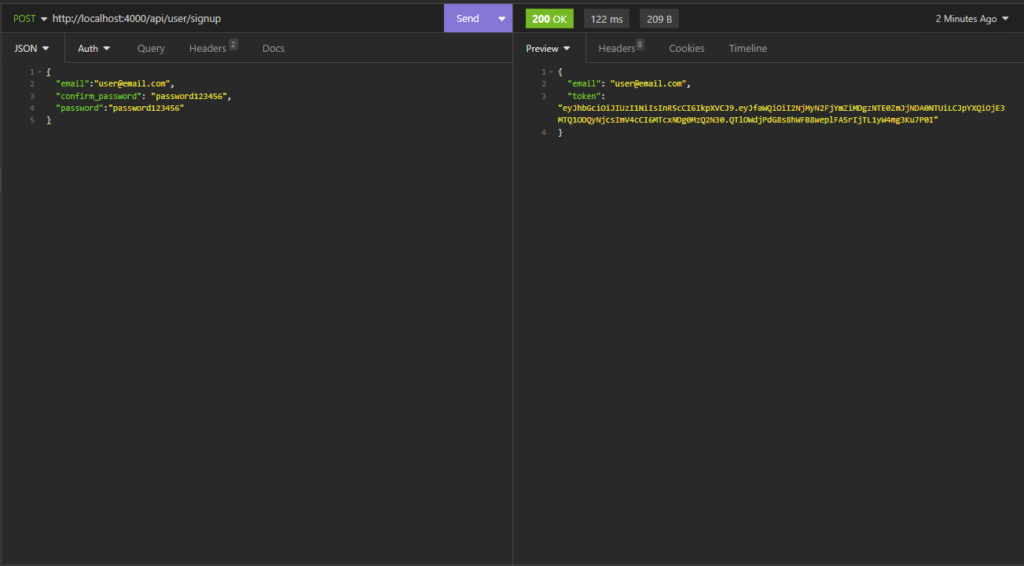
/api/user/signup (This route will be used for registering new users)

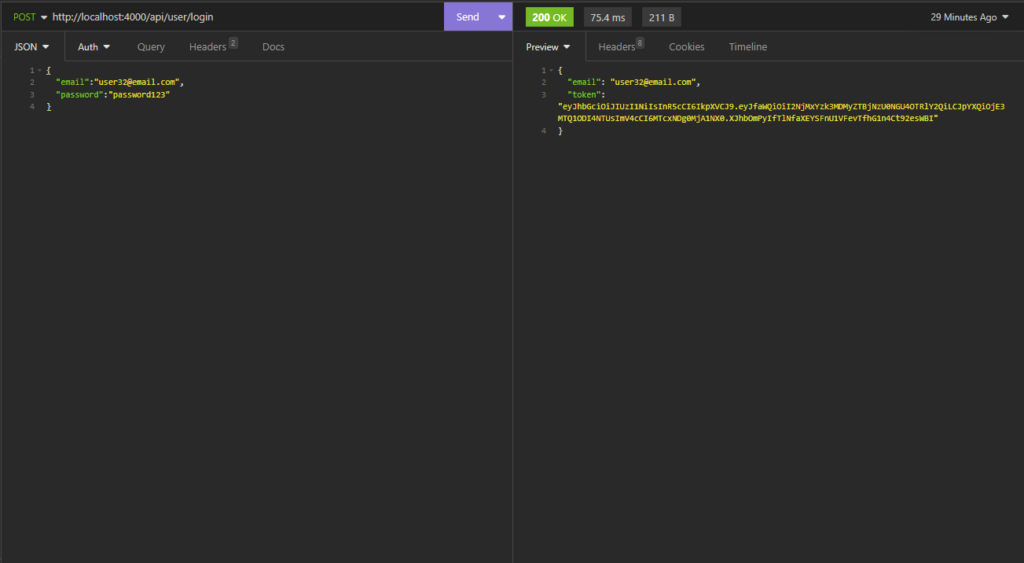
/api/user/login (This route will be used for login)

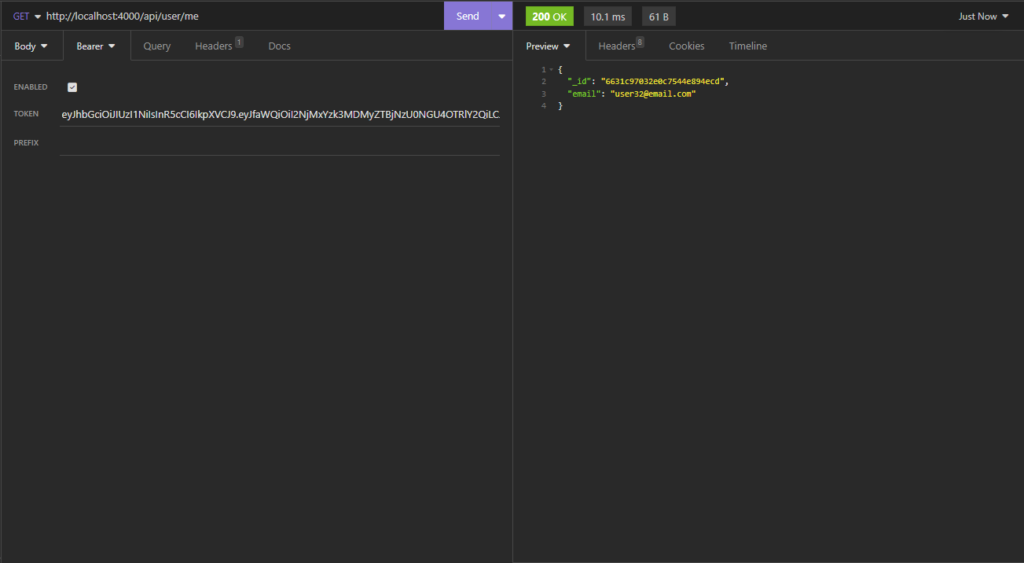
/api/user/me (this route is for getting the authenticated user’s information)


