Contents
Today I will be showing you how to create a REST API using CodeIgniter 4. This tutorial will be giving you the starting point on building API’s using CodeIgniter.
CodeIgniter is a open-source web framework that is used for rapid web development. CodeIgniter follows the MVC (Model-View-Controller) architectural pattern. It is noted for its speed compared to other PHP web frameworks.
REST API is used for communication between client and server. REST stands for representational state transfer and API stand for application programming interface. REST API or also known as RESTful API is a type of API that uses the REST architectural style, an API is uses REST if it has this characteristics:
- Client-Server – The communication between Client and Server.
- Stateless – After the server completed a http request, no session information is retained on the server.
- Cacheable – Response from the server can be cacheable or non cacheable.
- Uniform Interface – This are the constraints that simplify things. The constraints are Identification of the resources, resource manipulation through representations, self-descriptive messages, hypermedia as the engine of application state.
- Layered System – These are intermediaries between client and server like proxy servers, cache servers, etc.
- Code on Demand(Optional) – This is optional, the ability of the server to send executable codes to the client like java applets or JavaScript code, etc.
Step 1: Install CodeIgniter 4
For us to install CodeIgniter 4 we can install via composer or directly download CodeIgniter 4 here:
Install via composer:
composer create-project codeigniter4/appstarter ci-4-crud-ajax
Step 2: Change CodeIgniter Environment
The default environment of CodeIgniter is production, it is a safety feature to add security in case settings are messed up when it goes live. For us to change the environment we will rename or copy the file env to .env. Once it is renamed, open the file and uncomment and change the CI_ENVIRONMENT value from production to development.
.env
CI_ENVIRONMENT = development
Step 3: Configure Database
After setting up the environment, we will then configure our database. You can configure it on .env or on the config file located at app/Config/Database.php. For this tutorial we will configure it on app/Config/Database.php.
Configure the database connection values:
app/Config/Database.php.
<?php

namespace Config;

use CodeIgniter\Database\Config;

/**
 * Database Configuration
 */
class Database extends Config
{
	/**
	 * The directory that holds the Migrations
	 * and Seeds directories.
	 *
	 * @var string
	 */
	public $filesPath = APPPATH . 'Database' . DIRECTORY_SEPARATOR;

	/**
	 * Lets you choose which connection group to
	 * use if no other is specified.
	 *
	 * @var string
	 */
	public $defaultGroup = 'default';

	/**
	 * The default database connection.
	 *
	 * @var array
	 */
	public $default = [
		'DSN'      => '',
		'hostname' => 'localhost',
		'username' => 'root',
		'password' => '',
		'database' => 'ci_4_crud_ajax',
		'DBDriver' => 'MySQLi',
		'DBPrefix' => '',
		'pConnect' => false,
		'DBDebug'  => (ENVIRONMENT !== 'production'),
		'charset'  => 'utf8',
		'DBCollat' => 'utf8_general_ci',
		'swapPre'  => '',
		'encrypt'  => false,
		'compress' => false,
		'strictOn' => false,
		'failover' => [],
		'port'     => 3306,
	];

	/**
	 * This database connection is used when
	 * running PHPUnit database tests.
	 *
	 * @var array
	 */
	public $tests = [
		'DSN'      => '',
		'hostname' => '127.0.0.1',
		'username' => '',
		'password' => '',
		'database' => ':memory:',
		'DBDriver' => 'SQLite3',
		'DBPrefix' => 'db_',  // Needed to ensure we're working correctly with prefixes live. DO NOT REMOVE FOR CI DEVS
		'pConnect' => false,
		'DBDebug'  => (ENVIRONMENT !== 'production'),
		'charset'  => 'utf8',
		'DBCollat' => 'utf8_general_ci',
		'swapPre'  => '',
		'encrypt'  => false,
		'compress' => false,
		'strictOn' => false,
		'failover' => [],
		'port'     => 3306,
	];

	//--------------------------------------------------------------------

	public function __construct()
	{
		parent::__construct();

		// Ensure that we always set the database group to 'tests' if
		// we are currently running an automated test suite, so that
		// we don't overwrite live data on accident.
		if (ENVIRONMENT === 'testing')
		{
			$this->defaultGroup = 'tests';
		}
	}

	//--------------------------------------------------------------------

}
Step 4: Create A Model and Migration
Model – it a class that represents a database table.
Migration – like version control for the database that allows us to modify and share database schema to your team.
Execute this command on the Terminal or CMD to create a model:
php spark make:model ProjectModel
Open the created model at app/Models/ProjectModel.php. Inside the file you can see configuration options, you can read the documentation to further learn about its configuration options. We will now update the configs:
app/Models/ProjectModel.php
<?php

namespace App\Models;

use CodeIgniter\Model;

class ProjectModel extends Model
{
    protected $DBGroup              = 'default';
    protected $table                = 'projects';
    protected $primaryKey           = 'id';
    protected $useAutoIncrement     = true;
    protected $insertID             = 0;
    protected $returnType           = 'object';
    protected $useSoftDeletes       = true;
    protected $protectFields        = true;
    protected $allowedFields        = ['name', 'description'];

    // Dates
    protected $useTimestamps        = true;
    protected $dateFormat           = 'datetime';
    protected $createdField         = 'created_at';
    protected $updatedField         = 'updated_at';
    protected $deletedField         = 'deleted_at';

    // Validation
    protected $validationRules      = [
        'name' => 'required',
        'description' => 'required',
    ];
    protected $validationMessages   = [];
    protected $skipValidation       = false;
    protected $cleanValidationRules = true;

    // Callbacks
    protected $allowCallbacks       = true;
    protected $beforeInsert         = [];
    protected $afterInsert          = [];
    protected $beforeUpdate         = [];
    protected $afterUpdate          = [];
    protected $beforeFind           = [];
    protected $afterFind            = [];
    protected $beforeDelete         = [];
    protected $afterDelete          = [];
}
After creating the model, we will then create a migration file.
Execute this command on the Terminal or CMD to create a migration:
php spark make:migration AddProject
Open the created migration file on app/Database/Migrations/ and paste these codes:
<?php

namespace App\Database\Migrations;

use CodeIgniter\Database\Migration;

class AddProject extends Migration
{
    public function up()
    {
        $this->forge->addField([
            'id' => [
'type' => 'BIGINT',
'constraint' => 255,
'unsigned' => true,
'auto_increment' => true
            ],
            'name' => [
'type' => 'VARCHAR',
'constraint' => '255',
            ],
            'description' => [
'type' => 'TEXT'
            ],
            'created_at' => [
'type' => 'TIMESTAMP',
'null' => true
            ],
            'updated_at' => [
'type' => 'TIMESTAMP',
'null' => true
            ],
            'deleted_at' => [
'type' => 'TIMESTAMP',
'null' => true
            ],
        ]);
        $this->forge->addPrimaryKey('id');
        $this->forge->createTable('projects');
    }

    public function down()
    {
        $this->forge->dropTable('projects');
    }
}
Run the migration by executing the migrate command:
php spark migrate
Step 5: Create Controller
We will be using the ResourceController in handling HTTP requests. ResourceController gives us convenience in building the RESTful API because it provides methods for each HTTP methods.
Execute this command on the Terminal or CMD to create a ResourceController :
php spark make:controller Project --restful
After executing the command, it will create a file located at app/Controllers/Project.php. Open the file and insert these codes:
app/Controllers/Project.php
<?php

namespace App\Controllers;

use CodeIgniter\RESTful\ResourceController;

class Project extends ResourceController
{
	protected $modelName = 'App\Models\ProjectModel';
	protected $format    = 'json';

	/**
	 * Return an array of resource objects, themselves in array format
	 *
	 * @return mixed
	 */
	public function index()
	{
		return $this->respond($this->model->findAll(), 200);
	}

	/**
	 * Return the properties of a resource object
	 *
	 * @return mixed
	 */
	public function show($id = null)
	{
		$data = $this->model->find($id);
		if(is_null($data)) {
			return $this->fail(['error' => 'Project does not exist'], 404);
		}

		return $this->respond($data,200);
	}


	/**
	 * Create a new resource object, from "posted" parameters
	 *
	 * @return mixed
	 */
	public function create()
	{
		$data = [
            'name' => $this->request->getPost('name'),
            'description' => $this->request->getPost('description'),
        ];

		if ($this->model->insert($data) === false){

			$response = [
				'errors' => $this->model->errors(),
				'message' => 'Invalid Inputs'
			];

			return $this->fail($response , 409);
        }

		return $this->respond(['message' => 'Created Successfully'],201);
	}

	/**
	 * Add or update a model resource, from "posted" properties
	 *
	 * @return mixed
	 */
	public function update($id = null)
	{
		$data = [
            'name' => $this->request->getVar('name'),
            'description' => $this->request->getVar('description'),
        ];

        if ($this->model->where('id', $id)->set($data)->update() === false)
        {
			$response = [
				'errors' => $this->model->errors(),
				'message' => 'Invalid Inputs'
			];
            return $this->fail($response , 409);
        }

        return $this->respond(['message' => 'Updated Successfully'], 200);
	}

	/**
	 * Delete the designated resource object from the model
	 *
	 * @return mixed
	 */
	public function delete($id = null)
	{
		$this->model->delete($id);
		return $this->respond(['message' => 'Deleted Successfully'], 200);
	}
}
Step 6: Register Routes
Since we are using ResourceController we will use the resource() method. This method will create routes necessary for the ResourceController. You can check the documentation to see the routes it creates. Open the config file for routing located at app/Config/Routes.php and add this code:
app/Config/Routes.php
<?php

namespace Config;

// Create a new instance of our RouteCollection class.
$routes = Services::routes();

// Load the system's routing file first, so that the app and ENVIRONMENT
// can override as needed.
if (file_exists(SYSTEMPATH . 'Config/Routes.php'))
{
	require SYSTEMPATH . 'Config/Routes.php';
}

/**
 * --------------------------------------------------------------------
 * Router Setup
 * --------------------------------------------------------------------
 */
$routes->setDefaultNamespace('App\Controllers');
$routes->setDefaultController('Home');
$routes->setDefaultMethod('index');
$routes->setTranslateURIDashes(false);
$routes->set404Override();
$routes->setAutoRoute(true);


/*
 * --------------------------------------------------------------------
 * Route Definitions
 * --------------------------------------------------------------------
 */

// We get a performance increase by specifying the default
// route since we don't have to scan directories.
$routes->get('/', 'Home::index');

$routes->resource('projects', ['controller' => 'Project', 'only' => ['index', 'show', 'create', 'update', 'delete']]);
/*
 * --------------------------------------------------------------------
 * Additional Routing
 * --------------------------------------------------------------------
 *
 * There will often be times that you need additional routing and you
 * need it to be able to override any defaults in this file. Environment
 * based routes is one such time. require() additional route files here
 * to make that happen.
 *
 * You will have access to the $routes object within that file without
 * needing to reload it.
 */
if (file_exists(APPPATH . 'Config/' . ENVIRONMENT . '/Routes.php'))
{
	require APPPATH . 'Config/' . ENVIRONMENT . '/Routes.php';
}
Step 7: Run the Application
Now that we have completed the steps above we will now run the app. To run the app, execute this command:
php spark serve
Open this URL in your browser and now you can test the CodeIgniter CRUD app:
http://localhost:8080
Result:
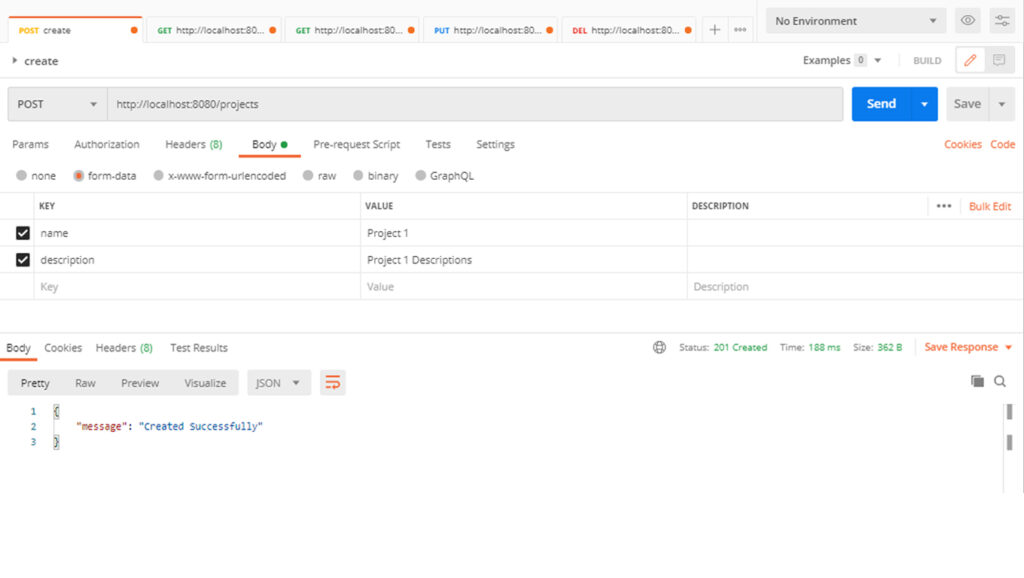
Create Resource Request (POST)
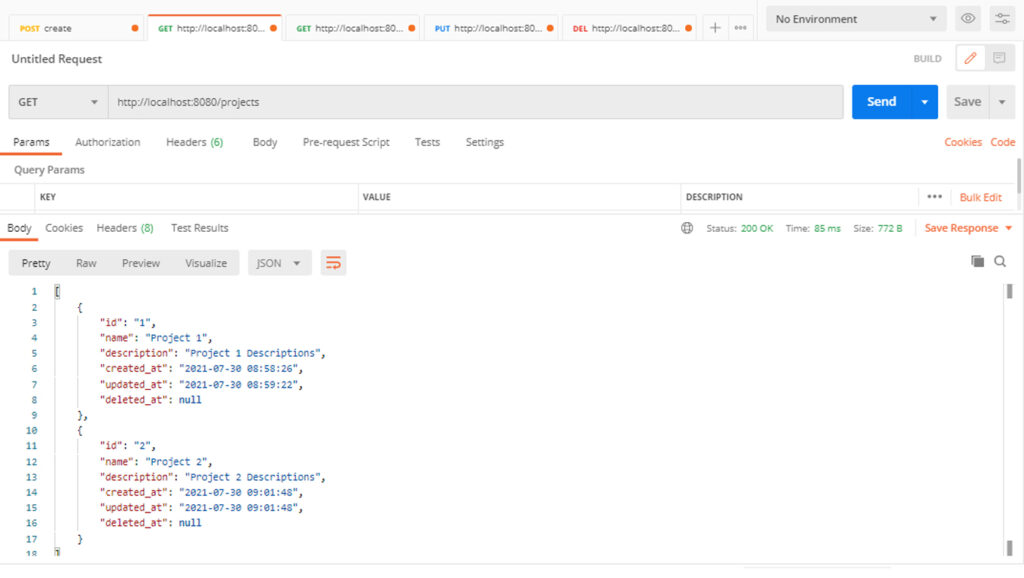
Get List of Resource Request (GET)
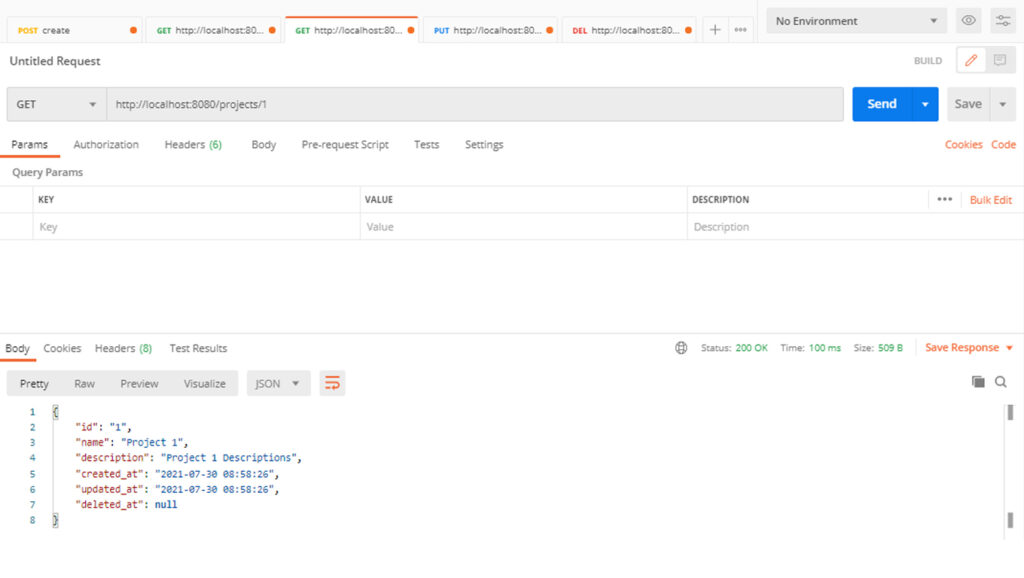
Get Specific Resource Request(GET)
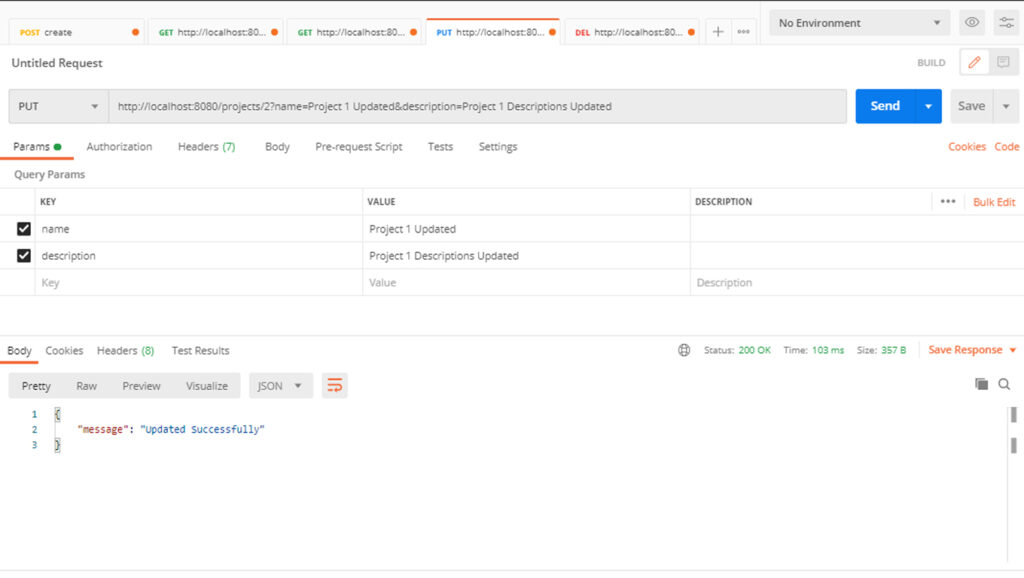
Update Resource Request (PUT)
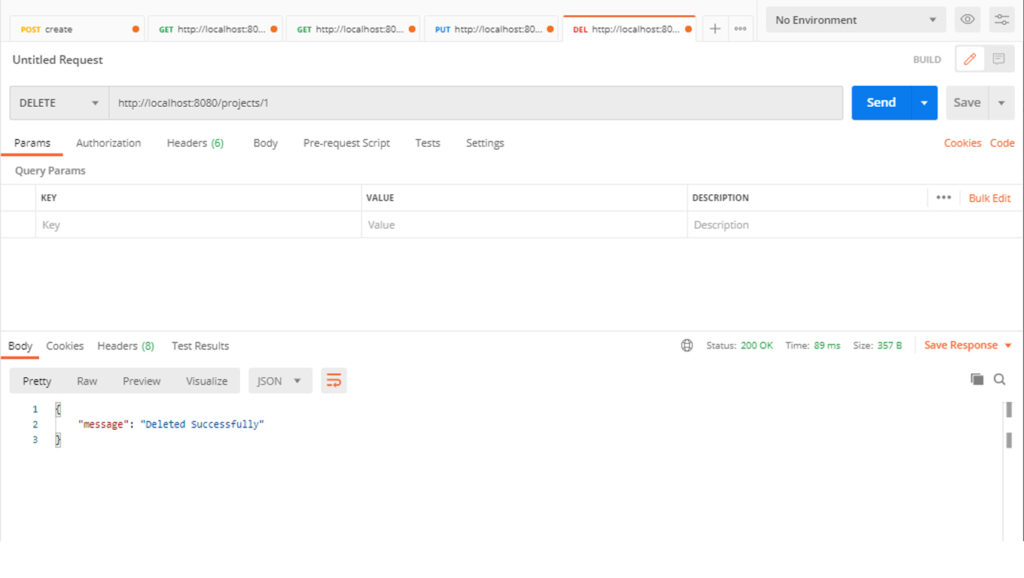
Delete Resource Request(DELETE)
