Contents
Introduction:
Today, I will be showing you how to integrate the Stripe payment gateway in Laravel 10. A payment gateway is one of the essential parts of an e-commerce site or any app that requires payment processing. One of the most popular payment processing platforms is Stripe. Stripe has been one of the most chosen payment platforms for its simple integration and fast account setup.
We will be using Laravel 10. Laravel is a free, open-source PHP Web Framework intended to develop web applications following the MVC (Model-View-Controller) architectural pattern. It is designed to make developing web apps faster and easier by using built-in features.
In this tutorial, I will not be showing all the Stripe APIs but I will show you how to create a simple charge and how to install the Stripe package on Laravel 10. Before proceeding please check the prerequisite for Laravel 10, you can see it below or you can read it on the Laravel 10 documentation. We will now start the integration of Stripe to Laravel.
Prerequisite:
- Composer
- PHP >= 8.1
Step 1: Install Laravel 10
First, select a folder where you want Laravel to be installed then execute this command on Terminal or CMD to install Laravel 10:
Install via composer:
composer create-project laravel/laravel:^10.0 laravel-10-stripe-payment-gateway
Install via Laravel Install:
laravel new laravel-10-stripe-payment-gateway
Step 2: Install Stripe Package
Move to the newly created Laravel project and install the stripe package.
Execute this command:
composer require stripe/stripe-php
Step 3: Set Up Stripe Configurations
Add stripe API keys on the .env file. the API keys are found on your Stripe Dashboard under Developer API keys.
.env
STRIPE_KEY=pk_test_XXXXXXXXX
STRIPE_SECRET=sk_test_XXXXXXXXX
After adding this value to the .env file. Open the config/services.php file and add the stripe credentials as an array.
config/services.php
 'stripe' => [
        'secret' => env('STRIPE_SECRET'),
    ],
You can find your API keys on your stripe account dashboard, navigate to Developers > API Keys.
Step 4: Create StripeController
Run this command to create a controller:
php artisan make:controller StripeController
After creating a controller, add these lines of codes to the app\Http\Controllers\StripeController.php file:
app\Http\Controllers\StripeController.php
<?php

namespace App\Http\Controllers;

use Illuminate\Http\Request;
use Stripe;

class StripeController extends Controller
{
    public function index()
    {
        return view('checkout');
    }


    public function createCharge(Request $request)
    {
        Stripe\Stripe::setApiKey(env('STRIPE_SECRET'));
        Stripe\Charge::create ([
                "amount" => 5 * 100,
                "currency" => "usd",
                "source" => $request->stripeToken,
                "description" => "Binaryboxtuts Payment Test"
        ]);

        return redirect('stripe')->with('success', 'Payment Successful!');
    }
}
Step 5: Create Blade File
Blade is the simple but powerful templating engine in laravel. blade view files have a .blade.php files extension and are usually stored in “resources/views/” folder.
Create a blade file “checkout.blade.php” inside the following path “resources/views/”. After creating the blade file, Insert the code below:
resources/views/checkout.blade.php
<!doctype html>
<html>
<head>
    <meta charset="utf-8">
    <meta name="viewport" content="width=device-width, initial-scale=1">
    <link href="https://cdn.jsdelivr.net/npm/bootstrap@5.0.2/dist/css/bootstrap.min.css" rel="stylesheet" integrity="sha384-EVSTQN3/azprG1Anm3QDgpJLIm9Nao0Yz1ztcQTwFspd3yD65VohhpuuCOmLASjC" crossorigin="anonymous">
    <script src="https://cdn.jsdelivr.net/npm/bootstrap@5.0.2/dist/js/bootstrap.bundle.min.js" integrity="sha384-MrcW6ZMFYlzcLA8Nl+NtUVF0sA7MsXsP1UyJoMp4YLEuNSfAP+JcXn/tWtIaxVXM" crossorigin="anonymous"></script>
</head>
<body>
    <div class="container">
        <div class="row justify-content-center">
            <div class="col-4">
                <div class="card">
                    <div class="card-body">
                        @if (session('success'))
                        <div
                            style="color: green;
                                border: 2px green solid;
                                text-align: center;
                                padding: 5px;margin-bottom: 10px;">
                            Payment Successful!
                        </div>
                        @endif
                        <form id='checkout-form' method='post' action="{{url('/stripe/create-charge')}}">
                            @csrf
                            <input type='hidden' name='stripeToken' id='stripe-token-id'>
                            <label for="card-element" class="mb-5">Checkout Forms</label>
                            <br>
                            <div id="card-element" class="form-control" ></div>
                            <button
                                id='pay-btn'
                                class="btn btn-success mt-3"
                                type="button"
                                style="margin-top: 20px; width: 100%;padding: 7px;"
                                onclick="createToken()">PAY $5
                            </button>
                        <form>
                    </div>
                </div>
            </div>
        </div>
    </div>

    <script src="https://js.stripe.com/v3/"></script>
    <script>
        var stripe = Stripe('{{ env('STRIPE_KEY') }}')
        var elements = stripe.elements();
        var cardElement = elements.create('card');
        cardElement.mount('#card-element');

        function createToken() {
            document.getElementById("pay-btn").disabled = true;
            stripe.createToken(cardElement).then(function(result) {


                if(typeof result.error != 'undefined') {
                    document.getElementById("pay-btn").disabled = false;
                    alert(result.error.message);
                }

                // creating token success
                if(typeof result.token != 'undefined') {
                    document.getElementById("stripe-token-id").value = result.token.id;
                    document.getElementById('checkout-form').submit();
                }
            });
        }
    </script>
</body>
</html>
Step 6: Create Routes
After creating the controller and its blade, register the routes for the stripe:
routes/web.php
<?php

use Illuminate\Support\Facades\Route;
use App\Http\Controllers\StripeController;

/*
|--------------------------------------------------------------------------
| Web Routes
|--------------------------------------------------------------------------
|
| Here is where you can register web routes for your application. These
| routes are loaded by the RouteServiceProvider within a group which
| contains the "web" middleware group. Now create something great!
|
*/

Route::get('/', function () {
    return view('welcome');
});

Route::get('stripe', [StripeController::class, 'index']);
Route::post('stripe/create-charge', [StripeController::class, 'createCharge'])->name('stripe.create-charge');
Step 7: Run the Application
After finishing the steps above, you can now run your application by executing the code below:
php artisan serve
After successfully running your app, open this URL in your browser:
http://localhost:8000/stripe
Screenshots:
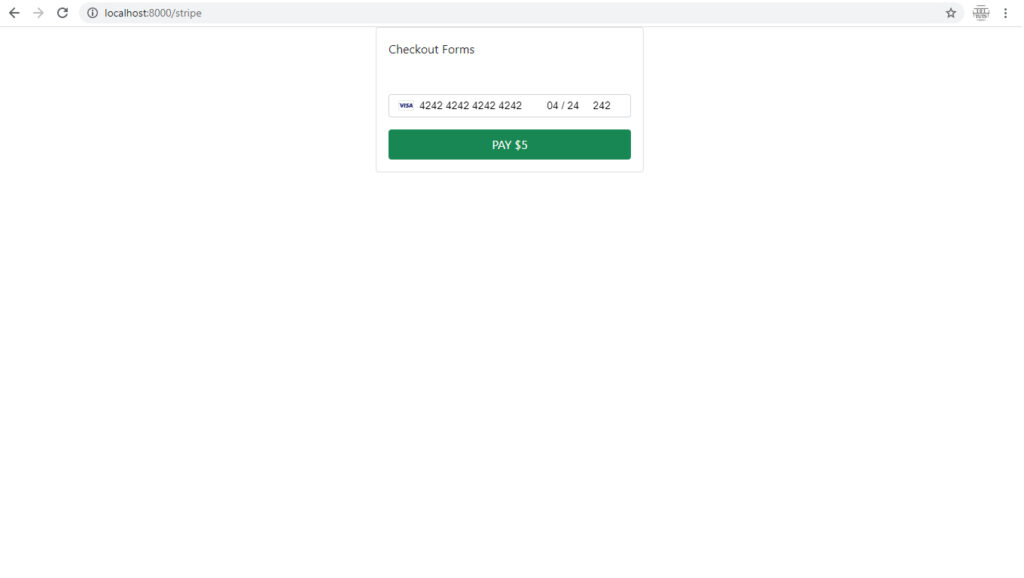
Before Payment Transaction:

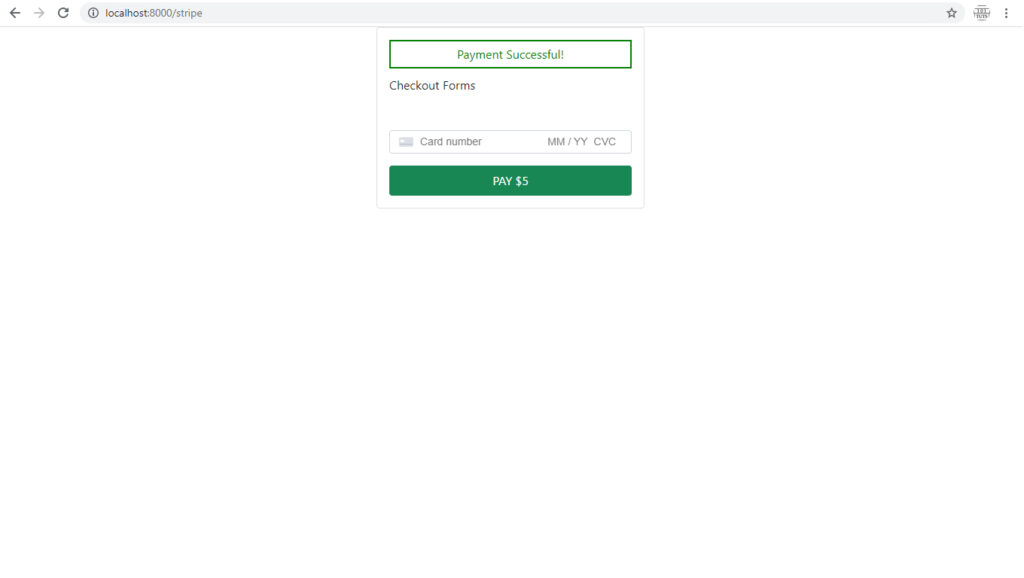
After Payment Transaction:


