Contents
Good day to you, welcome to this blog. In this blog tutorial, I will teach you to create QR Codes in Laravel 8. This tutorial teaches you the step-by-step procedure in order for the reader to easily understand.
What is a QR Code? QR stands for Quick Response. A Qr Code is a type of barcode that is a machine-readable optical label that contains information about the item to which it is attached. Qr Code may contain a locator, identifier, or a link to a website and etc. QR Code is one of the most used types of two-dimensional code.
Laravel is a free, open-source PHP Web Framework intended for the development of web applications following the MVC (Model-View-Controller) architectural pattern. Laravel is designed to make developing web apps faster and easier by using built-in features.
Before we proceed, please add an image in this directory “public/img/logo.png”, it will be used for inserting images on QR codes.
Step 1: Install Laravel 8
Run this command on Terminal or CMD to install Laravel via composer:
composer create-project laravel/laravel:^8.0 laravel-8-qr-code-generator
or via Laravel Installer:
laravel new laravel-9-qr-code-generator
Step 2: Install Simple QrCode Package
We will then install this package simplesoftwareio/simple-qrcode, this package will be used for generating QR Codes.
composer require simplesoftwareio/simple-qrcode
Once done installing the package, we are set to go in generating QR codes.
You can read the more detailed documentation of simple-qrcode package by clicking this link.
Step 3: Create A View
After installing the package, we will now create the view file that we will then display the QR codes. Create a file name qr-codes.blade.php in resources/views directory and add these lines of codes:
/resources/views/qr-codes.blade.php
<!doctype html>
<html lang="en">
  <head>
    <meta charset="utf-8">
    <meta name="viewport" content="width=device-width, initial-scale=1">
    <title>Qr Code</title>
    <link href="https://cdn.jsdelivr.net/npm/bootstrap@5.2.2/dist/css/bootstrap.min.css" rel="stylesheet" integrity="sha384-Zenh87qX5JnK2Jl0vWa8Ck2rdkQ2Bzep5IDxbcnCeuOxjzrPF/et3URy9Bv1WTRi" crossorigin="anonymous">
  </head>
  <body>
    <div class="container text-center">
        <div class="row">
            <div class="col">
                <p class="mb-0">Simple</p>
                {!! $simple !!}
            </div>
            <div class="col">
                <p class="mb-0">Color Change</p>
                {!! $changeColor !!}
            </div>
            <div class="col">
                <p class="mb-0">Background Color Change </p>
                {!! $changeBgColor !!}
            </div>
        </div>
        <div class="row mt-5">
            <div class="col">
                <p class="mb-0">Style Square</p>
                {!! $styleSquare !!}
            </div>
            <div class="col">
                <p class="mb-0">Style Dot</p>
                {!! $styleDot !!}
            </div>
            <div class="col">
                <p class="mb-0">Style Round</p>
                {!! $styleRound !!}
            </div>
        </div>
        <div class="row mt-5">
            <div class="col">
                <p class="mb-0">With Image</p>
                <img src="data:image/png;base64, {!!  base64_encode($withImage) !!}"/>
            </div>
        </div>
    </div>
    <script src="https://cdn.jsdelivr.net/npm/bootstrap@5.2.2/dist/js/bootstrap.bundle.min.js" integrity="sha384-OERcA2EqjJCMA+/3y+gxIOqMEjwtxJY7qPCqsdltbNJuaOe923+mo//f6V8Qbsw3" crossorigin="anonymous"></script>
  </body>
</html>
Step 4: Create A Controller
We will now create our controller, run this command to create a controller:
php artisan make:controller QrCodeGeneratorController
After creating a controller add this method:
/app/Http/Controllers/PdfGeneratorController.php
<?php

namespace App\Http\Controllers;

use Illuminate\Http\Request;
use SimpleSoftwareIO\QrCode\Facades\QrCode;

class QrCodeGeneratorController extends Controller
{
    public function generate() {
        $qrCodes = [];
        $qrCodes['simple'] = QrCode::size(120)->generate('https://www.binaryboxtuts.com/');
        $qrCodes['changeColor'] = QrCode::size(120)->color(255, 0, 0)->generate('https://www.binaryboxtuts.com/');
        $qrCodes['changeBgColor'] = QrCode::size(120)->backgroundColor(255, 0, 0)->generate('https://www.binaryboxtuts.com/');

        $qrCodes['styleDot'] = QrCode::size(120)->style('dot')->generate('https://www.binaryboxtuts.com/');
        $qrCodes['styleSquare'] = QrCode::size(120)->style('square')->generate('https://www.binaryboxtuts.com/');
        $qrCodes['styleRound'] = QrCode::size(120)->style('round')->generate('https://www.binaryboxtuts.com/');

        $qrCodes['withImage'] = QrCode::size(200)->format('png')->merge('/public/img/logo.png', .4)->generate('https://www.binaryboxtuts.com/');

        return view('qr-codes', $qrCodes);

    }
}
Step 5: Register Route
Now we will be registering the route for generating the QR Codes. Open the file /routes/web.php and update the routes:
<?php

use App\Http\Controllers\QrCodeGeneratorController;
use Illuminate\Support\Facades\Route;


/*
|--------------------------------------------------------------------------
| Web Routes
|--------------------------------------------------------------------------
|
| Here is where you can register web routes for your application. These
| routes are loaded by the RouteServiceProvider within a group which
| contains the "web" middleware group. Now create something great!
|
*/

Route::get('/', function () {
    return view('welcome');
});

Route::get('/qr-codes', [QrCodeGeneratorController::class, 'generate']);
Step 6: Run the Application
After finishing the steps above, you can now run your application by executing the code below:
php artisan serve
After successfully running your app, open this URL in your browser:
http://127.0.0.1:8000/qr-codes
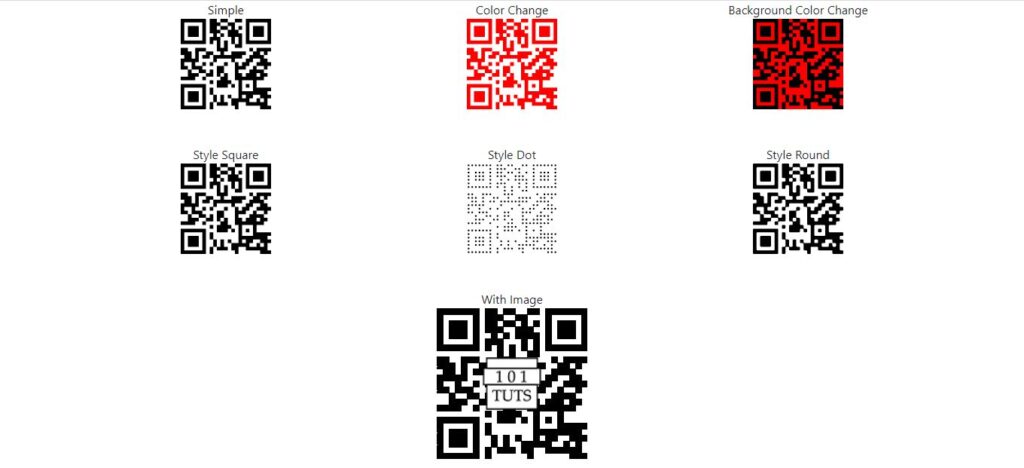
Screenshots:
QR Codes


