Contents
Today I will teach you to make a multiple file upload in Laravel 12. Uploading files is common on most online platforms today, like uploading photos on social media, uploading videos on a video-sharing platform, or uploading a resume on a job searching site.
We will be using Laravel 12 in this tutorial. Laravel is a free, open-source PHP Web Framework intended for the development of web applications following the MVC (Model-View-Controller) architectural pattern. Laravel is designed to make developing web apps faster and easier by using built-in features.
Prerequisite:
Before we proceed, we must update the composer, laravel installer, node, and npm on our local environment:
- PHP >= 8.2
- Node >= 18.18.2
- NPM >= 9.8.1
- Composer >= 2.8.6
- Laravel Installer >= 5.12.2
If you are having trouble updating the Composer follow these steps:
composer self-update
If you are having trouble updating the Laravel Installer follow these steps:
composer global remove laravel/installer
composer global update
composer global require laravel/installer
Step 1: Install Laravel 12
Run this command on Terminal or CMD to install Laravel:
Install via Laravel Install:
laravel new laravel-12-multiple-file-upload
Follow these choices:


Step 2: Set Database Configuration
We set up the database configuration during our installation. We can change it by going inside the project root folder, opening the file .env, and put the configuration for the database.
.env
DB_CONNECTION=mysql
DB_HOST=127.0.0.1
DB_PORT=3306
DB_DATABASE=your database name(laravel_12_multiple_file_upload)
DB_USERNAME=your database username(root)
DB_PASSWORD=your database password(root)
Step 3: Create Model and Database Migration
Model – it is a class that represents a database table.
Migration – like version control for the database that allows us to modify and share database schema to your team.
Execute this command on the Terminal or CMD to create a model and migration:
php artisan make:model FileUpload --migration
After this command, you will find one file in this path “database/migrations” and put the code below on the migration file.
<?php

use Illuminate\Database\Migrations\Migration;
use Illuminate\Database\Schema\Blueprint;
use Illuminate\Support\Facades\Schema;

return new class extends Migration
{
    /**
     * Run the migrations.
     */
    public function up(): void
    {
        Schema::create('file_uploads', function (Blueprint $table) {
            $table->id();
            $table->string('filename');
            $table->string('filepath');
            $table->string('type');
            $table->timestamps();
        });
    }

    /**
     * Reverse the migrations.
     */
    public function down(): void
    {
        Schema::dropIfExists('file_uploads');
    }
};
Run the migration by executing the migrate Artisan command:
php artisan migrate
Step 4: Create A Controller
Execute this command to create a controller:
php artisan make:controller FileUploadController
This command will generate a controller at “app/Http/Controllers/FileUploadController.php”. Open the file and insert these codes:
<?php

namespace App\Http\Controllers;

use Illuminate\Http\Request;
use App\Models\FileUpload;

class FileUploadController extends Controller
{
    public function index()
    {
        $fileUplaods = FileUpload::get();
        return view('file-upload', ['fileUploads' => $fileUplaods]);
    }

    public function multipleUpload(Request $request)
    {
        request()->validate([
            'fileuploads' => 'required',
            'fileuploads.*' => 'mimes:doc,pdf,docx,pptx,zip'
        ]);

        $files = $request->file('fileuploads');
        foreach($files as $file){
            $fileUpload = new FileUpload;
            $fileUpload->filename = $file->getClientOriginalName();
            $fileUpload->filepath = $file->store('fileuploads');
            $fileUpload->type= $file->getClientOriginalExtension();
            $fileUpload->save();
        }

        return redirect()->route('fileupload.index')->with('success','Files uploaded successfully!');
    }
}
Step 5: Register Routes
After creating a controller, register these 2 routes.
routes/web.php
<?php

use Illuminate\Support\Facades\Route;
use App\Http\Controllers\FileUploadController;

Route::get('/', function () {
    return view('welcome');
});

Route::get('/file-upload', [FileUploadController::class, 'index'])->name('fileupload.index');
Route::post('/multiple-file-upload', [FileUploadController::class, 'multipleUpload'])->name('multiple.fileupload');
Step 6: Create Blade File
Blade is the simple but powerful templating engine in laravel. blade view files have a .blade.php files extension and are usually stored in “resources/views/” folder.
Create this blade file and insert these codes:
resources/views/file-upload.blade.php
<!DOCTYPE html>
<html>
<head>
    <title>Multitple File Upload</title>
    <link href="https://cdn.jsdelivr.net/npm/bootstrap@5.0.2/dist/css/bootstrap.min.css" rel="stylesheet" integrity="sha384-EVSTQN3/azprG1Anm3QDgpJLIm9Nao0Yz1ztcQTwFspd3yD65VohhpuuCOmLASjC" crossorigin="anonymous">
    <script src="https://cdn.jsdelivr.net/npm/bootstrap@5.0.2/dist/js/bootstrap.bundle.min.js" integrity="sha384-MrcW6ZMFYlzcLA8Nl+NtUVF0sA7MsXsP1UyJoMp4YLEuNSfAP+JcXn/tWtIaxVXM" crossorigin="anonymous"></script>
</head>
<body>


<div class="container">
    <h2 class="text-center mt-5 mb-3">Multitple File Upload</h2>
    <div class="card">
        <div class="card-body">
            @if ($message = Session::get('success'))
                <div class="alert alert-success">
                    <b>{{ $message }}</b>
                </div>
            @endif
            @if ($errors->any())
                <div class="alert alert-danger">
                    <ul>
                        @foreach ($errors->all() as $error)
                            <li>{{ $error }}</li>
                        @endforeach
                    </ul>
                </div>
            @endif

            <form class="row" method="post" action="{{url('multiple-file-upload')}}" enctype="multipart/form-data">
                {{ csrf_field() }}
                <div class="col-auto">
                    <input type="file" name="fileuploads[]" class=" form-control" multiple >
                </div>
                <div class="col-auto">
                    <button type="submit" class="btn btn-outline-primary mb-3">Upload Files</button>
                </div>
            </form>
            <table class="table table-bordered mt-3">
                <thead>
                    <tr>
                        <th>Filename</th>
                        <th>Filepath</th>
                        <th>File Type</th>
                    </tr>
                </thead>
                <tbody>
                @foreach ($fileUploads as $fileUpload)
                    <tr>
                        <td>{{ $fileUpload->filename }}</td>
                        <td>{{ $fileUpload->filepath }}</td>
                        <td>{{ $fileUpload->type }}</td>
                    </tr>
                @endforeach
                </tbody>

            </table>
        </div>
    </div>

</div>


</body>
</html>
Step 7 : Run the Application
After finishing the steps above, you can now run your application by executing the code below:
php artisan serve
After successfully running your app, open this URL in your browser:
http://localhost:8000/file-upload
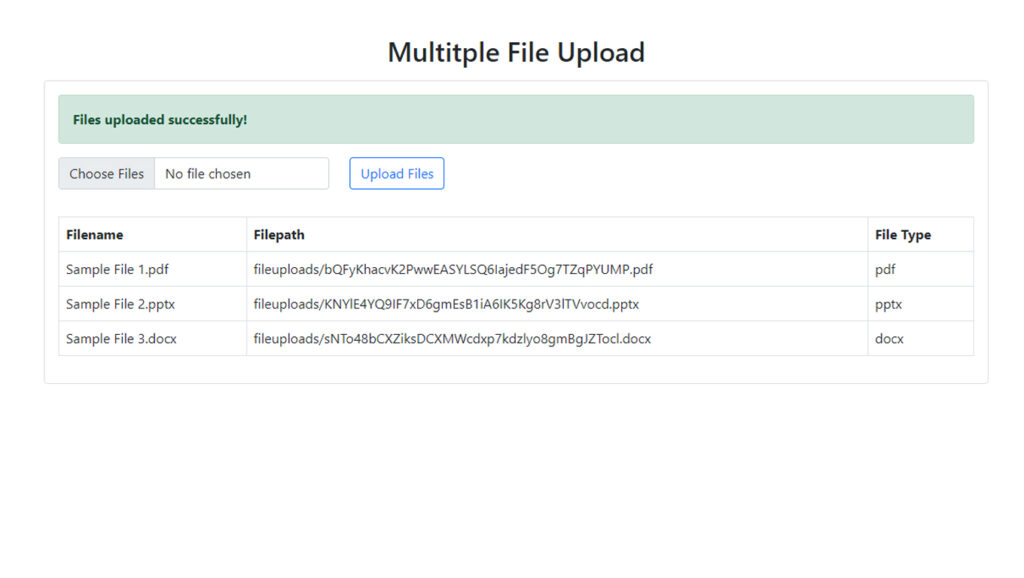
Screenshots:
Laravel 12 Multiple File Upload


