Contents
Today I will teach you to make a multiple file upload in Laravel 8. Uploading files are common on most of the online platforms today, like uploading photos on social media, uploading videos in a video sharing platform or uploading resume in a job searching site.
We will be using Laravel 8 on this tutorial. Laravel is a free, open-source PHP Web Framework and intended for the development of web applications following the MVC (Model-View-Controller) architectural pattern. Laravel is designed to make developing web apps faster and easier by using the built-in features.
Prerequisite:
- Composer
- MySQL
- PHP >= 7.3.0
Step 1: Install Laravel 8
First, select a folder that you want the Laravel to be installed then execute this command on Terminal or CMD to install Laravel 8:
Install via composer:
composer create-project --prefer-dist laravel/laravel laravel-8-multiple-file-upload
Install via Laravel Install:
laravel new laravel-8-multiple-file-upload
Step 2: Set Database Configuration
Open the .env file and set database configuration:
.env
DB_CONNECTION=mysql
DB_HOST=127.0.0.1
DB_PORT=3306
DB_DATABASE=your database name(laravel_8_multiple_file_upload)
DB_USERNAME=your database username(root)
DB_PASSWORD=your database password(root)
Step 3: Create Model and Database Migration
Model – it a class that represents a database table.
Migration – like version control for the database that allows us to modify and share database schema to your team.
Execute this command on the Terminal or CMD to create a model and migration:
php artisan make:model FileUpload --migration
After this command you will find one file in this path “database/migrations” and put the code below on the migration file.
<?php

use Illuminate\Database\Migrations\Migration;
use Illuminate\Database\Schema\Blueprint;
use Illuminate\Support\Facades\Schema;

class CreateFileUploadsTable extends Migration
{
    /**
     * Run the migrations.
     *
     * @return void
     */
    public function up()
    {
        Schema::create('file_uploads', function (Blueprint $table) {
            $table->id();
            $table->string('filename');
            $table->string('filepath');
            $table->string('type');
            $table->timestamps();
        });
    }

    /**
     * Reverse the migrations.
     *
     * @return void
     */
    public function down()
    {
        Schema::dropIfExists('file_uploads');
    }
}
Run the migration by executing the migrate Artisan command:
php artisan migrate
Step 4: Create A Controller
Execute this command to create a controller:
php artisan make:controller FileUploadController
This command will generate a controller at “app/Http/Controllers/FileUploadController.php”. Open the file and insert these codes:
<?php

namespace App\Http\Controllers;

use Illuminate\Http\Request;
use App\Models\FileUpload;

class FileUploadController extends Controller
{
    public function index()
    {
        $fileUplaods = FileUpload::get();
        return view('file-upload', ['fileUploads' => $fileUplaods]);
    }

    public function multipleUpload(Request $request)
    {
        $this->validate($request, [
            'fileuploads' => 'required',
            'fileuploads.*' => 'mimes:doc,pdf,docx,pptx,zip'
        ]);

        $files = $request->file('fileuploads');
        foreach($files as $file){
            $fileUpload = new FileUpload;
            $fileUpload->filename = $file->getClientOriginalName();
            $fileUpload->filepath = $file->store('fileuploads');
            $fileUpload->type= $file->getClientOriginalExtension();
            $fileUpload->save();
        }

        return redirect()->route('fileupload.index')->with('success','Files uploaded successfully!');
    }
}
Step 5: Register Routes
After creating a controller, register these 2 routes.
routes/web.php
<?php

use Illuminate\Support\Facades\Route;
use App\Http\Controllers\FileUploadController;

/*
|--------------------------------------------------------------------------
| Web Routes
|--------------------------------------------------------------------------
|
| Here is where you can register web routes for your application. These
| routes are loaded by the RouteServiceProvider within a group which
| contains the "web" middleware group. Now create something great!
|
*/

Route::get('/file-upload', [FileUploadController::class, 'index'])->name('fileupload.index');
Route::post('/multiple-file-upload', [FileUploadController::class, 'multipleUpload'])->name('multiple.fileupload');
Step 6: Create Blade File
Blade is the simple but powerful templating engine in laravel. blade view files have a .blade.php files extension and usually stores on “resources/views/” folder.
Create this blade file and insert these codes:
resources/views/file-upload.blade.php
<!DOCTYPE html>
<html>
<head>
    <title>Multitple File Upload</title>
    <link href="https://cdn.jsdelivr.net/npm/bootstrap@5.0.2/dist/css/bootstrap.min.css" rel="stylesheet" integrity="sha384-EVSTQN3/azprG1Anm3QDgpJLIm9Nao0Yz1ztcQTwFspd3yD65VohhpuuCOmLASjC" crossorigin="anonymous">
    <script src="https://cdn.jsdelivr.net/npm/bootstrap@5.0.2/dist/js/bootstrap.bundle.min.js" integrity="sha384-MrcW6ZMFYlzcLA8Nl+NtUVF0sA7MsXsP1UyJoMp4YLEuNSfAP+JcXn/tWtIaxVXM" crossorigin="anonymous"></script>
</head>
<body>


<div class="container">
    <h2 class="text-center mt-5 mb-3">Multitple File Upload</h2>
    <div class="card">
        <div class="card-body">
            @if ($message = Session::get('success'))
                <div class="alert alert-success">
                    <b>{{ $message }}</b>
                </div>
            @endif
            @if ($errors->any())
                <div class="alert alert-danger">
                    <ul>
                        @foreach ($errors->all() as $error)
                            <li>{{ $error }}</li>
                        @endforeach
                    </ul>
                </div>
            @endif

            <form class="row" method="post" action="{{url('multiple-file-upload')}}" enctype="multipart/form-data">
                {{ csrf_field() }}
                <div class="col-auto">
                    <input type="file" name="fileuploads[]" class=" form-control" multiple >
                </div>
                <div class="col-auto">
                    <button type="submit" class="btn btn-outline-primary mb-3">Upload Files</button>
                </div>
            </form>
            <table class="table table-bordered mt-3">
                <thead>
                    <tr>
                        <th>Filename</th>
                        <th>Filepath</th>
                        <th>File Type</th>
                    </tr>
                </thead>
                <tbody>
                @foreach ($fileUploads as $fileUpload)
                    <tr>
                        <td>{{ $fileUpload->filename }}</td>
                        <td>{{ $fileUpload->filepath }}</td>
                        <td>{{ $fileUpload->type }}</td>
                    </tr>
                @endforeach
                </tbody>

            </table>
        </div>
    </div>

</div>


</body>
</html>
Step 7 : Run the Application
After finishing the steps above, you can now run your application by executing the code below:
php artisan serve
After successfully running your app, open this URL in your browser:
http://localhost:8000/file-upload
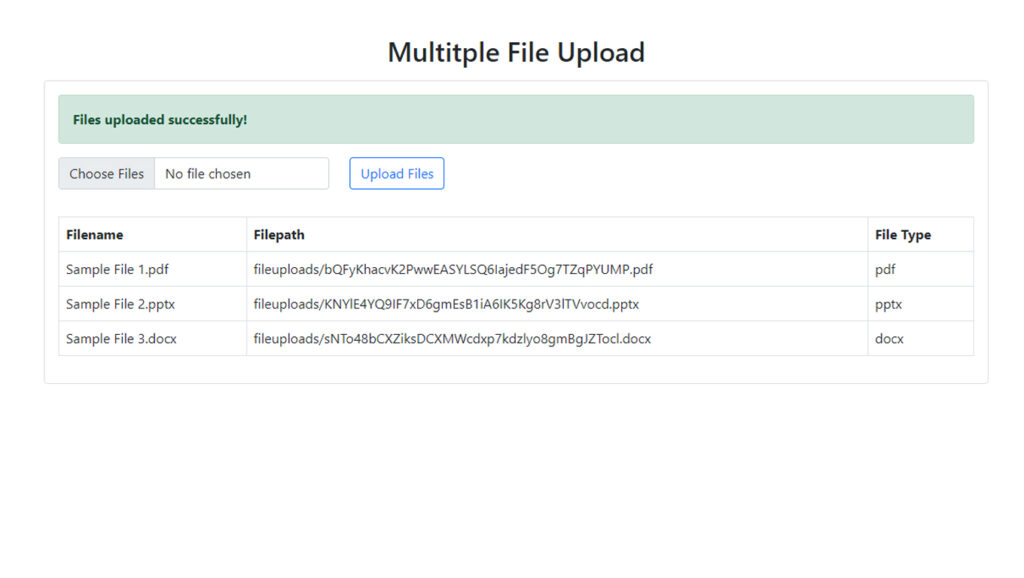
Screenshots:
Laravel 8 Multiple File Upload


