Contents
- Prerequisite:
- Step 1: Install Symfony 7
- Step 2: Install Packages
- Step 3: Set Database Configuration
- Step 4: Configure FOSRest Bundle
- Step 5: Create User Class
- Step 6: Create Migration
- Step 7: Configure JWT Bundle
- Step 8: Create Controllers
- Step 9: Configure Security.yaml
- Step 10: Run the Application
- Screenshots:
Hi! Today we will learn how to create an authentication on our Symfony 7 API. But before that let’s have a discussion about API and what is JSON Web Token(JWT).
API stands for Application Program Interface, API is an interface that allows applications to exchange data. To make it more clear, APIs are a set of functions that can be used by programmers to build software and applications.
JWT stands for JSON Web Token, it is an open standard (RFC 7519) that defines a compact and self-contained way for securely transmitting information between parties as a JSON object. JWT is commonly used for Authorization, Information Exchange and etc.
Now that we have a glimpse of the idea on the topic, We will now proceed on building the app.
Prerequisite:
- Composer
- Symfony CLI
- MySQL
- PHP >= 8.0.2
Step 1: Install Symfony 7
First, select a folder where you want Symfony to be installed then execute this command on Terminal or CMD to install:
Install via composer:
composer create-project symfony/skeleton:"7.0.*" symfony-7-jwt
Install via Symfony CLI:
symfony new symfony-7-jwt --version="7.0.*"
Step 2: Install Packages
After installing Symfony, we must install the necessary packages to our app. During the installation of the packages, it will ask you to execute the recipes, type y to confirm.
composer require jms/serializer-bundle
composer require friendsofsymfony/rest-bundle
composer require --dev symfony/maker-bundle
composer require symfony/orm-pack
composer require lexik/jwt-authentication-bundle
Step 3: Set Database Configuration
After installing, open the .env file and set the database configuration. We will be using MySQL in this tutorial. Uncomment the DATABASE_URL variable for MySQL and updates its configs. Make sure you commented out the other DATABASE_URL variables.
.env
# In all environments, the following files are loaded if they exist,
# the latter taking precedence over the former:
#
#  * .env                contains default values for the environment variables needed by the app
#  * .env.local          uncommitted file with local overrides
#  * .env.$APP_ENV       committed environment-specific defaults
#  * .env.$APP_ENV.local uncommitted environment-specific overrides
#
# Real environment variables win over .env files.
#
# DO NOT DEFINE PRODUCTION SECRETS IN THIS FILE NOR IN ANY OTHER COMMITTED FILES.
#
# Run "composer dump-env prod" to compile .env files for production use (requires symfony/flex >=1.2).
# https://symfony.com/doc/current/best_practices.html#use-environment-variables-for-infrastructure-configuration

###> symfony/framework-bundle ###
APP_ENV=dev
APP_SECRET=e0710317861221371d185cc932acd15b
###< symfony/framework-bundle ###

###> doctrine/doctrine-bundle ###
# Format described at https://www.doctrine-project.org/projects/doctrine-dbal/en/latest/reference/configuration.html#connecting-using-a-url
# IMPORTANT: You MUST configure your server version, either here or in config/packages/doctrine.yaml
#
# DATABASE_URL="sqlite:///%kernel.project_dir%/var/data.db"
# DATABASE_URL="mysql://db_user:db_password@127.0.0.1:3306/db_name?serverVersion=5.7"
DATABASE_URL="postgresql://db_user:db_password@127.0.0.1:5432/db_name?serverVersion=13&charset=utf8"
###< doctrine/doctrine-bundle ###
After configuring the database, execute this command to create the database:
php bin/console doctrine:database:create
Step 4: Configure FOSRest Bundle
Open the file config/packages/fos_rest.yaml and add these line:
config/packages/fos_rest.yaml
fos_rest:
    format_listener:
        rules:
            - { path: ^/api, prefer_extension: true, fallback_format: json, priorities: [ json, html ] }
Step 5: Create User Class
We will then create a user class, by using the make:user command – this command will create a User class for security and it will automatically update the security.yaml.
Follow these steps:
php bin/console make:user

 The name of the security user class (e.g. User) [User]:
 >

 Do you want to store user data in the database (via Doctrine)? (yes/no) [yes]:
 >

 Enter a property name that will be the unique "display" name for the user (e.g. email, username, uuid) [email]:
 >

 Will this app need to hash/check user passwords? Choose No if passwords are not needed or will be checked/hashed by some other system (e.g. a single sign-on server).

 Does this app need to hash/check user passwords? (yes/no) [yes]:
 >

 created: src/Entity/User.php
 created: src/Repository/UserRepository.php
 updated: src/Entity/User.php
 updated: config/packages/security.yaml


  Success!


 Next Steps:
   - Review your new App\Entity\User class.
   - Use make:entity to add more fields to your User entity and then run make:migration.
   - Create a way to authenticate! See https://symfony.com/doc/current/security.html
Before we do the migration, let’s add a new field named username. Update the file src\Entity\User.php,
src\Entity\User.php
<?php

namespace App\Entity;

use App\Repository\UserRepository;
use Doctrine\ORM\Mapping as ORM;
use Symfony\Component\Security\Core\User\PasswordAuthenticatedUserInterface;
use Symfony\Component\Security\Core\User\UserInterface;

#[ORM\Entity(repositoryClass: UserRepository::class)]
class User implements UserInterface, PasswordAuthenticatedUserInterface
{
    #[ORM\Id]
    #[ORM\GeneratedValue]
    #[ORM\Column]
    private ?int $id = null;

    #[ORM\Column(length: 180, unique: true)]
    private ?string $email = null;

    #[ORM\Column(length: 180, unique: true)]
    private ?string $username = null;

    #[ORM\Column]
    private array $roles = [];

    /**
     * @var string The hashed password
     */
    #[ORM\Column]
    private ?string $password = null;

    public function getId(): ?int
    {
        return $this->id;
    }

    public function getEmail(): ?string
    {
        return $this->email;
    }

    public function setEmail(string $email): static
    {
        $this->email = $email;

        return $this;
    }

    public function getUsername(): string
    {
        return $this->username;
    }

    public function setUsername(string $username): self
    {
        $this->username = $username;

        return $this;
    }

    /**
     * A visual identifier that represents this user.
     *
     * @see UserInterface
     */
    public function getUserIdentifier(): string
    {
        return (string) $this->email;
    }

    /**
     * @see UserInterface
     */
    public function getRoles(): array
    {
        $roles = $this->roles;
        // guarantee every user at least has ROLE_USER
        $roles[] = 'ROLE_USER';

        return array_unique($roles);
    }

    public function setRoles(array $roles): static
    {
        $this->roles = $roles;

        return $this;
    }

    /**
     * @see PasswordAuthenticatedUserInterface
     */
    public function getPassword(): string
    {
        return $this->password;
    }

    public function setPassword(string $password): static
    {
        $this->password = $password;

        return $this;
    }

    /**
     * @see UserInterface
     */
    public function eraseCredentials(): void
    {
        // If you store any temporary, sensitive data on the user, clear it here
        // $this->plainPassword = null;
    }
}
Step 6: Create Migration
Then we will create a migration file and then migrate it:
Execute this command to create a migration file:
php bin/console make:migration
Then execute this command to run the migration file:
php bin/console doctrine:migrations:migrate
Step 7: Configure JWT Bundle
We will create first the public and private keys. Execute this to generate SSL keys:
php bin/console lexik:jwt:generate-keypair
If you encounter an error while executing the command above, you can follow the command below, the command will ask for the paraphrase, the paraphrase must match the value on .env [ JWT_PASSPHRASE ].
mkdir config/jwt
openssl genrsa -out config/jwt/private.pem -aes256 4096
openssl rsa -pubout -in config/jwt/private.pem -out config/jwt/public.pem
Then we will update config/routes.yaml file:
api_login_check:
    path: /api/login_check
Step 8: Create Controllers
Let’s create a registration controller to add users. Execute this command to create a controller:
php bin\console make:controller RegistrationController
And add these lines of codes:
src/Controller/RegistrationController.php
<?php

namespace App\Controller;

use Symfony\Bundle\FrameworkBundle\Controller\AbstractController;
use Symfony\Component\HttpFoundation\JsonResponse;
use Symfony\Component\Routing\Attribute\Route;
use Symfony\Component\HttpFoundation\Request;
use Symfony\Component\PasswordHasher\Hasher\UserPasswordHasherInterface;
use Doctrine\Persistence\ManagerRegistry;
use App\Entity\User;

#[Route('/api', name: 'api_')]
class RegistrationController extends AbstractController
{
    #[Route('/register', name: 'register', methods: 'post')]
    public function index(ManagerRegistry $doctrine, Request $request, UserPasswordHasherInterface $passwordHasher): JsonResponse
    {
        $em = $doctrine->getManager();
        $decoded = json_decode($request->getContent());
        $email = $decoded->email;
        $plaintextPassword = $decoded->password;

        $user = new User();
        $hashedPassword = $passwordHasher->hashPassword(
            $user,
            $plaintextPassword
        );
        $user->setPassword($hashedPassword);
        $user->setEmail($email);
        $user->setUsername($email);
        $em->persist($user);
        $em->flush();

        return $this->json(['message' => 'Registered Successfully']);
    }
}
We then create a Dashboard Controller to test our JWT authentication.
php bin/console make:controller DashboardController
Open the file src/Controller/DashboardController.php and an /api route:
src/Controller/DashboardController.php
<?php

namespace App\Controller;

use Symfony\Bundle\FrameworkBundle\Controller\AbstractController;
use Symfony\Component\HttpFoundation\JsonResponse;
use Symfony\Component\Routing\Attribute\Route;

#[Route('/api', name: 'api_')]
class DashboardController extends AbstractController
{
    #[Route('/dashboard', name: 'app_dashboard')]
    public function index(): JsonResponse
    {
        return $this->json([
            'message' => 'Welcome to your new controller!',
            'path' => 'src/Controller/DashboardController.php',
        ]);
    }
}
Step 9: Configure Security.yaml
And lastly, we must configure the file config/packages/security.yaml to make the JWTauthentication work.
config/packages/security.yaml
security:
    password_hashers:
        App\Entity\User: 'auto'
        Symfony\Component\Security\Core\User\PasswordAuthenticatedUserInterface:
            algorithm: 'auto'
            cost:      15
    providers:
        app_user_provider:
            entity:
                class: App\Entity\User
                property: username
    firewalls:
        login:
            pattern: ^/api/login
            stateless: true
            json_login:
                check_path: /api/login_check
                success_handler: lexik_jwt_authentication.handler.authentication_success
                failure_handler: lexik_jwt_authentication.handler.authentication_failure

        api:
            pattern:   ^/api
            stateless: true
            jwt: ~
        dev:
            pattern: ^/(_(profiler|wdt)|css|images|js)/
            security: false
        main:
            lazy: true
            provider: app_user_provider

    access_control:
        - { path: ^/api/register, roles: PUBLIC_ACCESS  }
        - { path: ^/api/login, roles: PUBLIC_ACCESS  }
        - { path: ^/api,       roles: IS_AUTHENTICATED_FULLY }
Step 10: Run the Application
After finishing the steps above, you can now run your application by executing the command below:
symfony server:start
Screenshots:
/api/register (This route will be used for registering new users)

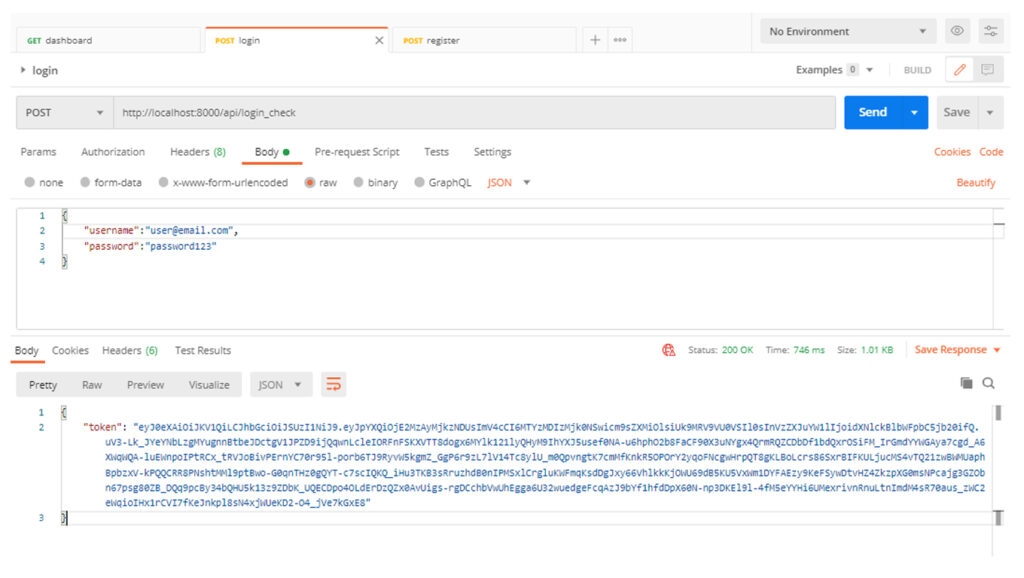
/api/login_check (This route will be used for login and for getting the bearer token)

/api/dashboard(this is a protected route), add the token on the Bearer Token to access:


